Install and use the Osprey COM add-in for Microsoft Outlook
Updated Apr 11th, 2024
Who is this guide for?
Any Users
The Osprey Approach Outlook add-in allows you to set up interactivity between Microsoft Outlook and Osprey. This guide will take you through installing and using the add-in.
This guide will take you through how to install and use the Osprey COM Add-in for Microsoft Outlook
Installing the Outlook add-in & logging in
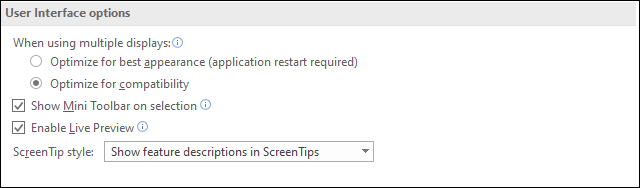
Prior to the installation of the add-in, you must ensure that your copy of Outlook is optimised for compatibility. To do this, select the ‘File’ tab in the top left of your Outlook screen and then select ‘Options’ from the resulting side menu.
When the Outlook Options panel appears, ensure that the ‘General’ tab is selected. You will have some ‘User Interface’ options at the top.
Ensure that ‘Optimise for Compatibility’ is selected as below, then click ‘OK’.
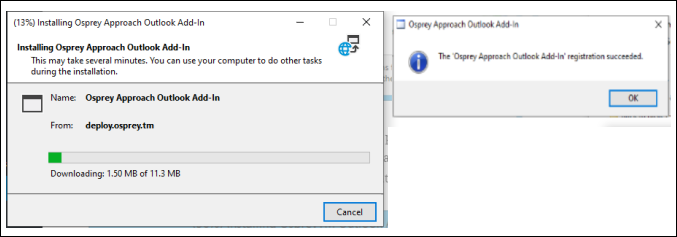
Please click here to download the add-in.
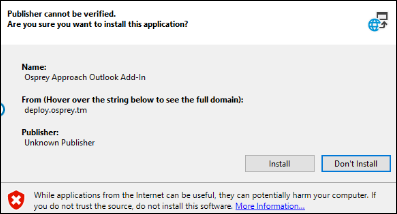
Click ‘Install’ when prompted and a progress bar will appear showing the progress of the install. Select ‘OK’ once the installation has been completed, finalising the registration.
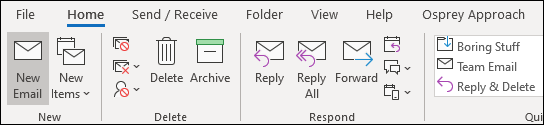
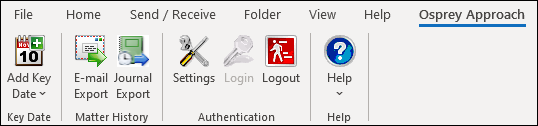
Once installed, if you open up Microsoft Outlook, you will now see an additional menu item in the top toolbar, ‘Osprey Approach’ as shown below.
Before using the Add-In, you must firstly apply the relevant Osprey settings. You are required to enter your Osprey URL and your Osprey username and password. If you do not enter the correct settings, you will be unable to use the application.
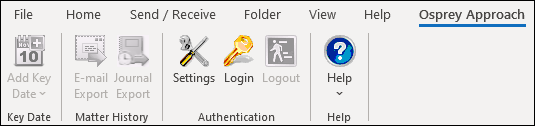
Click on the ‘Osprey’ tab and then select ‘Settings’.
Enter your Osprey URL into the ‘Site URL’ box. Please remember to include the https:// prefix to your URL, so it should display as below.
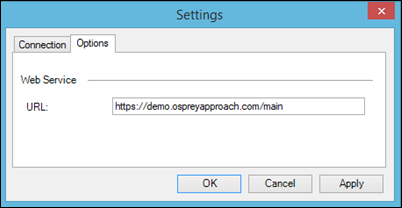
Click Apply.
On the Options tab, tick the ‘Display Osprey Panel on New Email Dialogue’ box to display a side panel on any new email which will allow you to use other email addresses stored in Osprey (including the dossier contacts and organisations) to email to from Outlook, as well as attach any documents from Osprey.
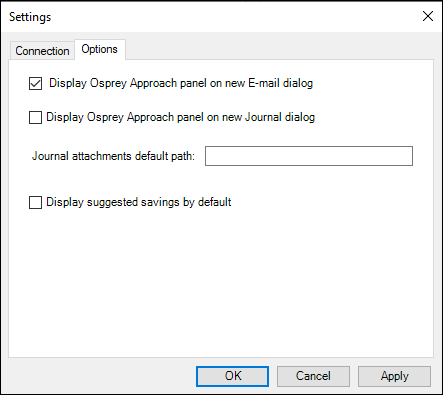
Ticking the ‘Display Suggested Savings’ box will show a list of potential files to save against when exporting an email.
Now click ‘Apply’ to keep your settings, then click ‘OK’. The panel should close and you can now select the option to ‘Login’ on the Osprey tab. Enter your Osprey username and password, then click ‘Login’.
All icons on the Osprey tab should now be available.
Once logged in, the ‘Login’ icon will now be greyed out and the ‘Logout’ icon will be selectable, as shown above. Click this to log out of the add-in.
From within Microsoft Outlook, the Osprey Add-In will allow you to:
- Email from Outlook using addresses stored in Osprey.
- Post time and save to the Osprey matter history from Outlook.
- Export emails to your Osprey matter history.
- Email packages from Outlook.
- Add and save key dates into your Outlook calendar.
- Add Outlook calendar appointments as key dates.
There is no need to have the Osprey application open; you just need to ensure you are logged into the Outlook add-in.
New email including replies
Open a new email in Outlook in the usual way. The Osprey side panel should now appear.
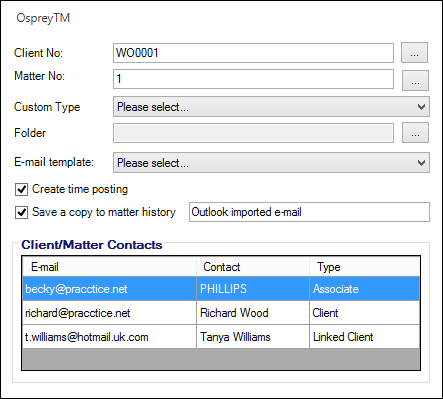
If you do not know the Client and Matter number you require, click the ‘…’ button next to either of the fields.
Search against appropriate values according to the information you have to hand, e.g. surname, forename, matter description; you can enter all or part of the text, then click ‘Search’.
Having located the matter required, right click on it and click ‘Select’. The screen will refresh to the new email screen. Click ‘Get Contacts’ to display all linked Client email addresses.
Choose the expert type of the required contact or organisation and click ‘Search’. This will now show you all relevant email addresses.
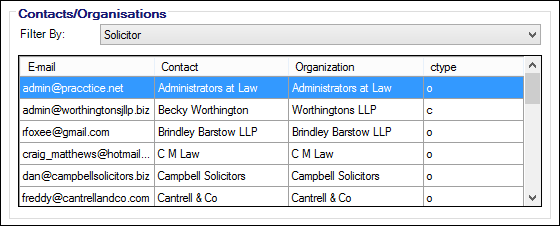
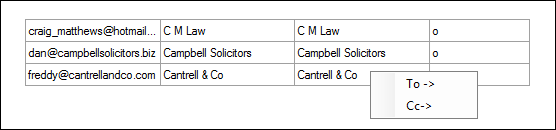
Once found, right-click each one in turn to add them to the To or CC box in the email as shown below.
You have the option to create a time posting and to save a copy of your email to matter history. If either of these options are not required, untick the check boxes before clicking to send the email.
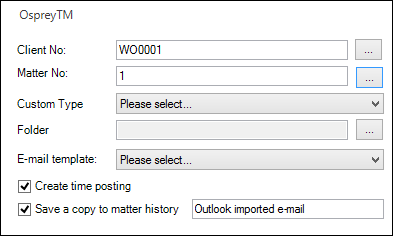
You also have the option to edit the matter history description at this point if you wish by overtyping the ‘Outlook Imported Email’ text.
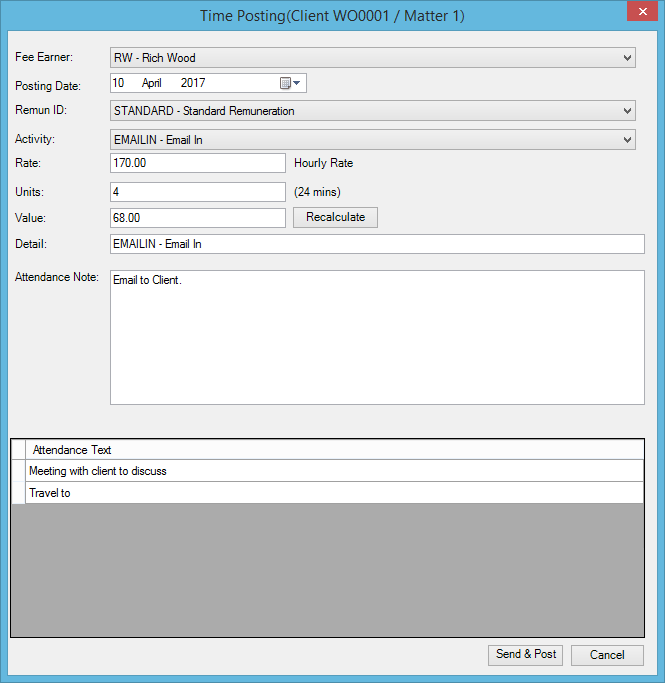
If you have retained the tick to post time, upon clicking ‘Send’, the Time Posting window will open. Complete the fields as normal then click SEND & POST.
If you retained the tick to save a copy to matter history, you will be able to see the email details in Matter History in Osprey, and by clicking on the ‘View’ option, you will be able to see any content.

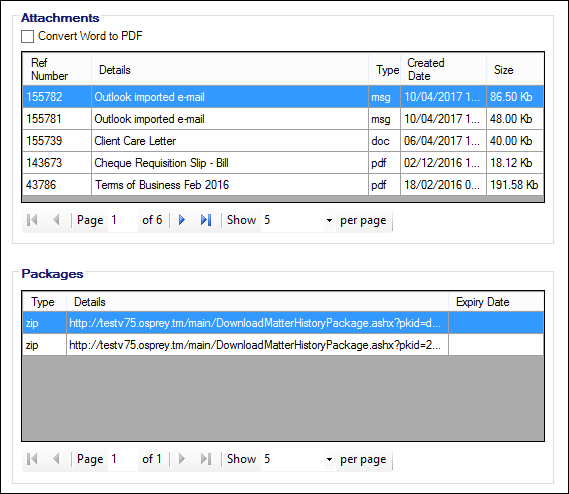
If the email contained an attachment, this can also be made visible by clicking ‘View’ at the bottom of the screen.
The ‘New Email’ side panel will also allow you to add attachments or packages from Osprey.
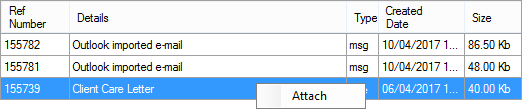
For attachments, simply right-click on the item you wish to include in the email and select ‘Attach’. This will add the selected item to your email as an attachment.
To send a package from Osprey, right click on the relevant package and select the ‘Add to Message’ option. This will add a link to the end of your email which, when received by the recipient, will enable them to click and download the package.

As we can see in the below image, both our attachment and package have been added to the email. This email can now be composed and sent as normal.
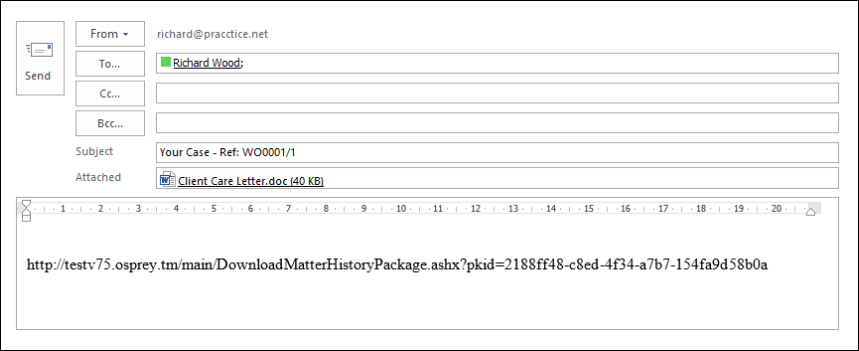
The client and matter number will be appended to the Subject of the email as well being tagged to the email header when the message is sent.
Received emails
To export your emails to the Osprey matter history, ensure that the correct email is selected from within any of your mailbox folders, right-click on the email, select Osprey and then click on Email Export.
Alternatively, select the email, then click on the ‘Email Export’ tab in your Outlook add-in.
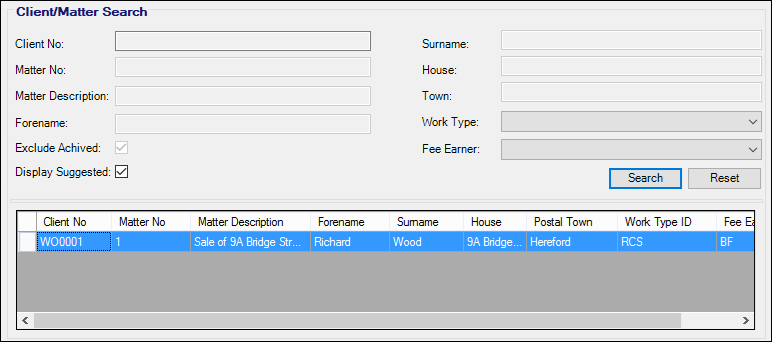
The ‘Email Export’ panel will now open. Search for the client and matter you wish to export to. If you do not know the client and matter number, use any of the other search options, as described previously.
Once you have located the required matter, you may if you wish edit the email description which will appear in the matter history, by clicking on it and editing as required.
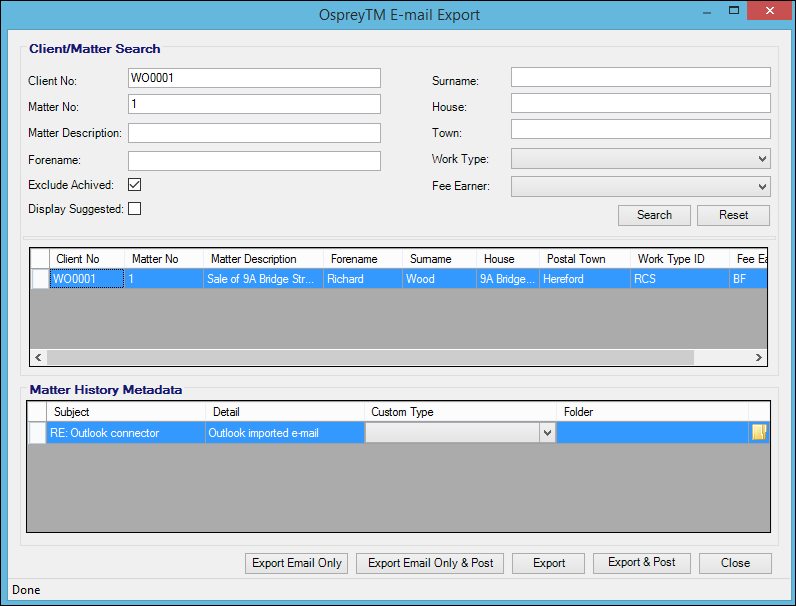
Export Email Only – This option will simply export the selected email into Osprey with any attachments visible under the ‘Attachments’ tab of the item details.
Export Email Only & Post – Will export the email and then open the Time Posting window for you to complete. As previously the attachment will be visible under the ‘Attachments’.
Export – Will export the email into Osprey and will also include any attachments as a separate item in the Matter History.
Export & Post – Exports the email and attachment as with the ‘Export’ option. The Time Posting window will then open for you to complete.
The Email Export Status window will confirm that the email has been successfully exported.
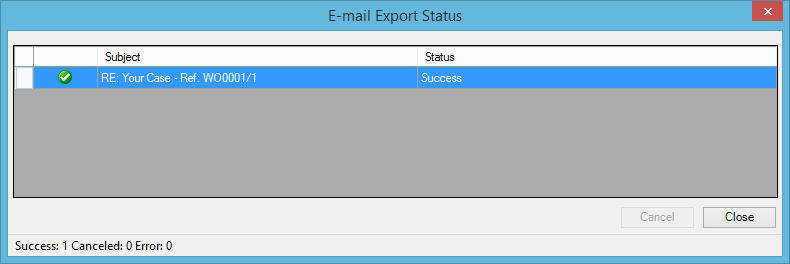
Click ‘Close’. The email will now appear in the Osprey Matter History.

Display Suggested
Display Suggested is a quick way of identifying a client to export any sent or received emails to. This feature can be enabled as a default in the Outlook settings or you can choose to select it at the time of importing emails.
Display Suggested will check the email subject line to see if it can identify a client and matter no, it will also check to see if it can identify any email address in the original email compared to the client’s email, matter email, any dossier email, also, any contact or organisation email linked to dossier fields. This feature can save time searching for the correct client and matter to export the email to.
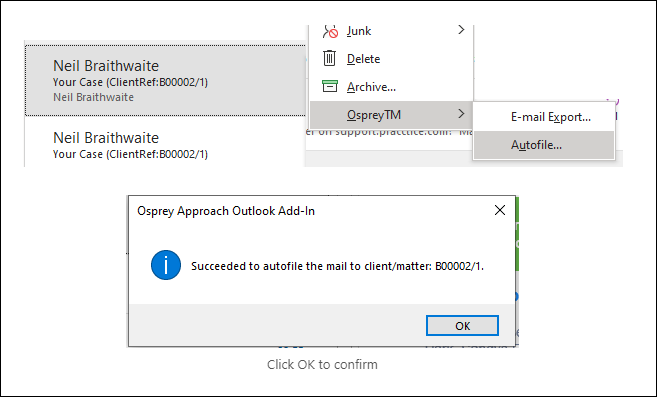
Autofile
Any replies to email sent using the new email panel within Outlook using the connector may be automatically filed into the clients matter history.
Right click the message and select OspreyTM > Autofile…
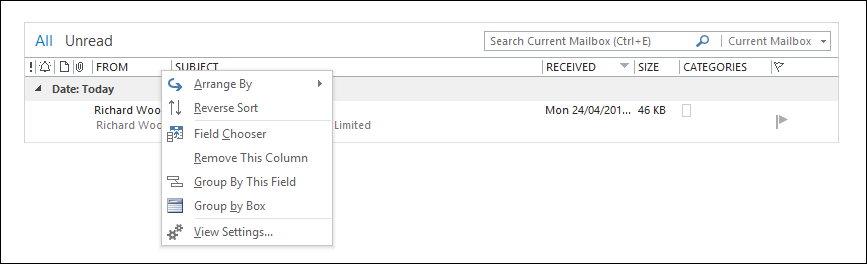
Showing exported to Osprey column
You may also add a column in Outlook to display emails exported to Osprey This will be useful to easily identify in Outlook which emails you have already exported.
The Osprey connector will hold the information of which client and matter(s) you have exported an email to, when you turn on a custom field. To do this, right-click on the heading row in your inbox on any of the column headings ‘From’, ‘Subject’, ‘Received’, etc. Now click on ‘Field Chooser’.
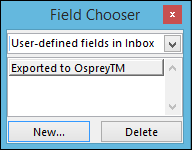
Select ‘User-Defined Fields in Inbox’ from the drop-down list at the top.
Drag the ‘Exported To Osprey’ field to the position in which you would like it to appear. Any subsequently exported emails will now appear.
And you will now see that the new column brings through the client and matter number to which the email was exported.

To add the column to a folder other than the Inbox, you need to create a new user defined field with the same name of ‘Exported to Osprey’. If this custom field is deleted from Outlook (in the screen above, you can choose to delete fields), all associated export data will also be deleted.
Key dates
We will now go through adding key dates to Osprey and calendar dates to Outlook.
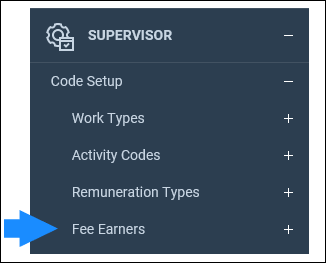
For all key date functionality, the Fee Earner’s Outlook username and password details MUST have previously been set correctly within the supervisor area of Osprey. If the details are not set up correctly, the key dates cannot be added to the relevant Fee Earner’s calendar.
To set this, navigate to the ‘Supervisor’ area of Osprey, then select ‘Code Setup’ and then click on ‘Fee Earners’.
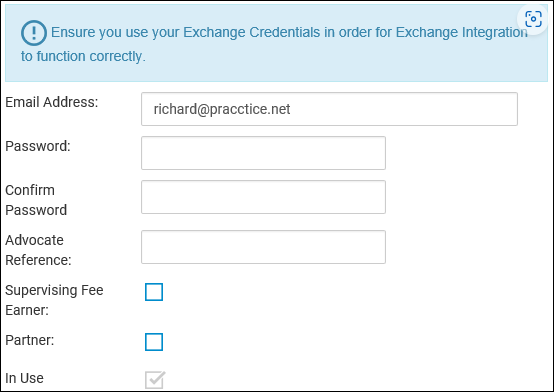
Right-click and select the ‘Edit’ icon corresponding to the Fee Earner you wish to have key dates available on his calendar and ensure that the ‘Email Address’ and ‘Password’ fields are filled in.
Adding a Key date
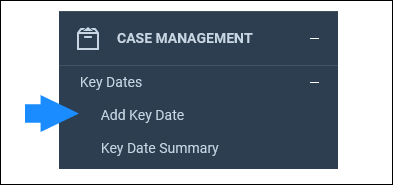
First, we will save a key date from Osprey into the Outlook calendar. Navigate to the ‘Case Management’ tab in Osprey and select ‘Key Dates’. Now click on ‘Add Key Date’.
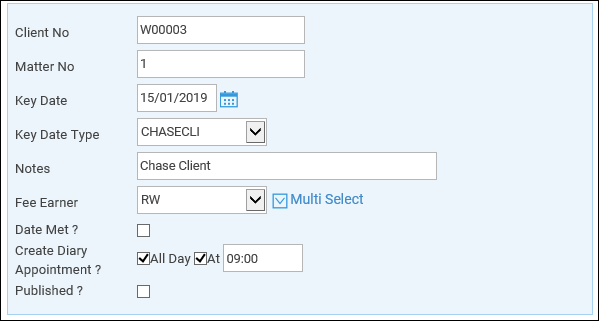
Create your diary appointment, ensuring that the relevant Fee Earner has been selected and that the ‘Create Diary Appointment’ box has been ticked.
You can also set a time should you wish.
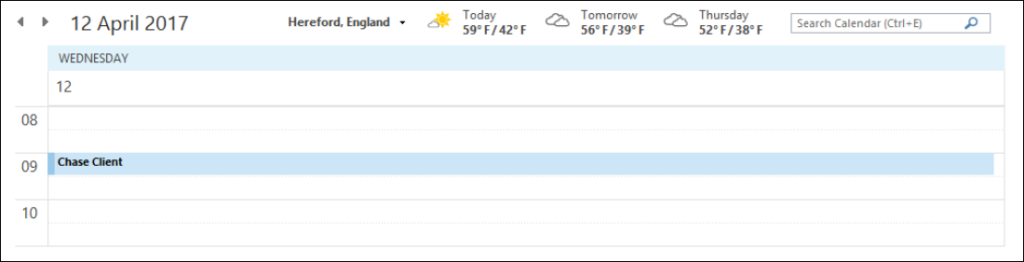
Now click the ‘Save’ icon. The new key date will now be visible as an appointment in the selected Fee Earner’s Outlook calendar.
Key Dates can also be created as appointments when an “Add Key Date” action is created as part of a workflow. The appointment will be created once the action has been run.
Outlook tasks
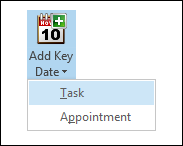
You may also add an Outlook task as a key date. Click the Osprey tab in Outlook, select the ‘Add Key Date’ icon and choose ‘Task’.
Use the Osprey Key Date Details screen to search for your client and matter, then enter the Fee Earner and key date type details. Leave the ‘Date Met’ checkbox empty so that it will appear as unmet in Osprey, unless you wish to record it as a met key date.
Tick the ‘Publish to Web Access’ box if you want it to appear on your Osprey Web Access site for clients to see. Now enter the Due Date and Subject in the Outlook details box on the left.
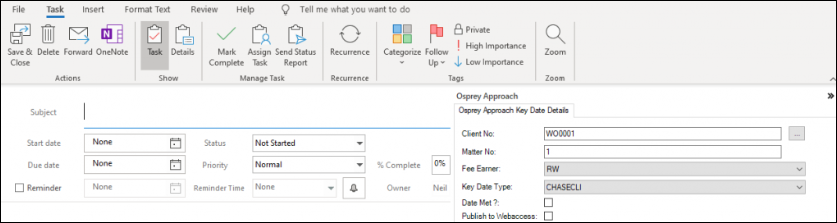
Click the ‘Save and Close’ button when done and your details will be saved in Outlook tasks and as a key date in Osprey.
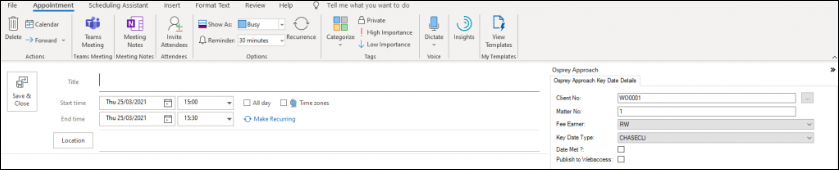
Outlook appointments
You can also add an Outlook calendar appointment as a key date. Click ‘Add Key Date’ from the Osprey menu in Outlook, select ‘Add Key Date’ and choose ‘Appointment’
As with the tasks detailed earlier, search for your client and matter, and then enter the fee earner and key date type details. Tick the box if the date is already met and you just want to record it, or leave blank if you want it to appear as unmet in Osprey.
Enter start and end dates and the subject in the Outlook details box on the left. Now click ‘Save and Close’ when done. Your details will be saved as an Appointment in the Outlook Calendar and as a Key Date in Osprey.