Expenses & overtime management
Updated Apr 8th, 2026
Who is this guide for?
Any Users
This guide will take you through the process of submitting and approving Expenses & Overtime
Expenses & overtime demo
Watch a quick walkthrough of how to submit, review, and approve expenses and overtime claims in Osprey, from draft through to payment.
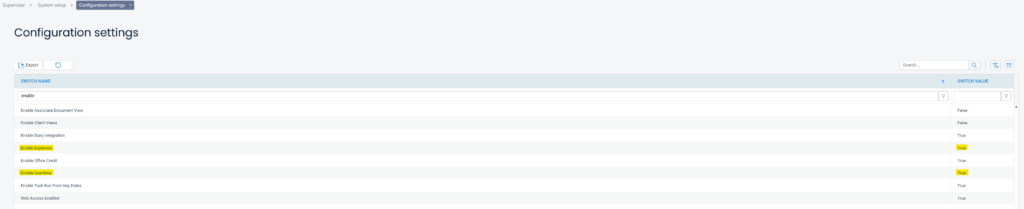
System Settings
In order to use Expenses & Overtime there are 2 system settings switches that need to be switched “on”. Navigate to Supervisor > System Setup > Configuration Settings and ensure that the below highlighted switches are set to TRUE. If they are not, right click them, select edit and change to TRUE.
Access Template
There is a new access template area that governs the Expenses & Overtime permissions within Osprey.
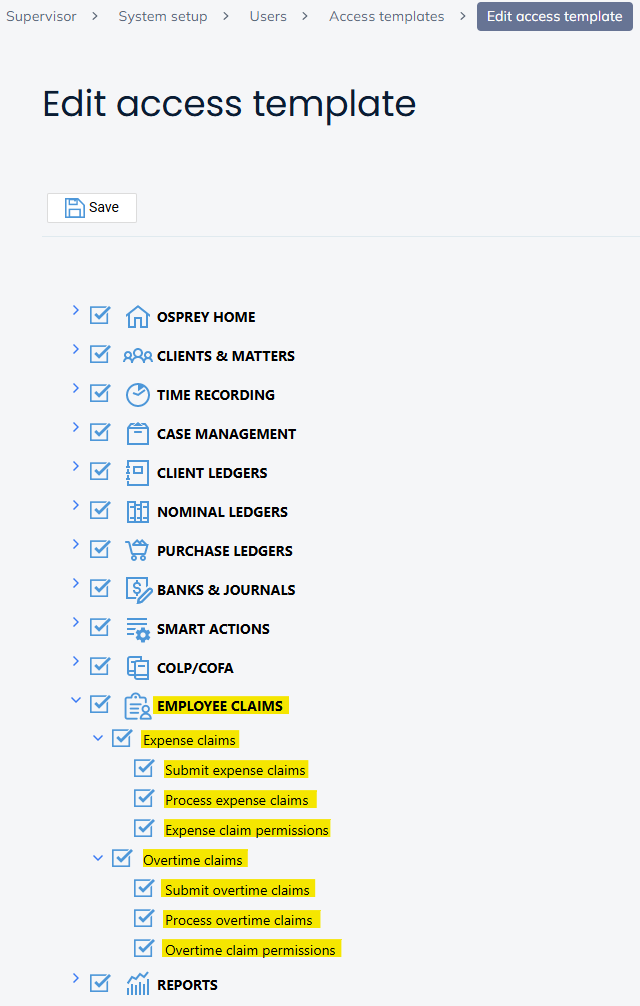
Submit Expense/Overtime claims – This allows the user to submit claims
Process Expense/Overtime claims – This allows the user to approve claims (subject to user permissions). Please note: When assigning this access area you must also assign Submit claims, it will not work if you give access to process but not submit.
Expense/Overtime claim permissions – This allows the user to set user permissions from within the Employee Claims area
Recording a draft Expense claim
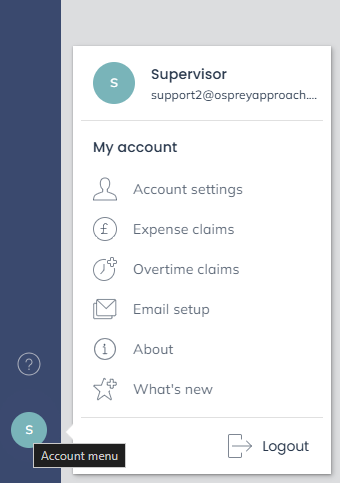
Claims are added within the User Profile account menu in the bottom left corner of Osprey
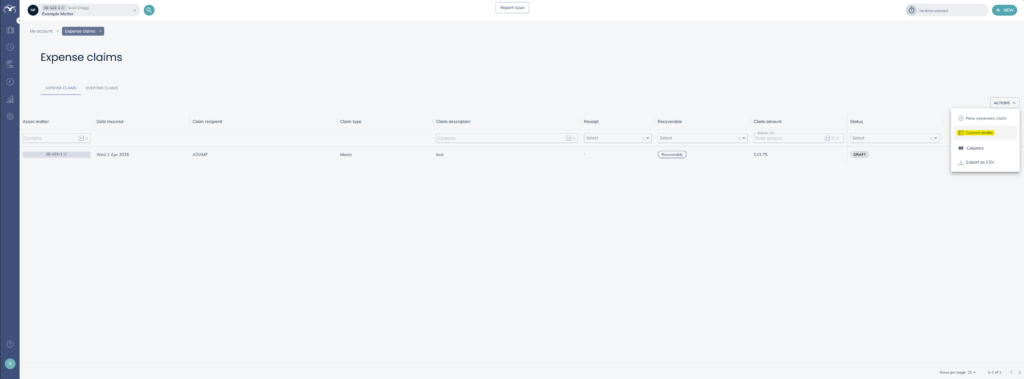
When you click into Expense claims you will see all the claims that you have added to the system. As you have accessed this from your user profile, you will only see your claims or claims that you have submitted.
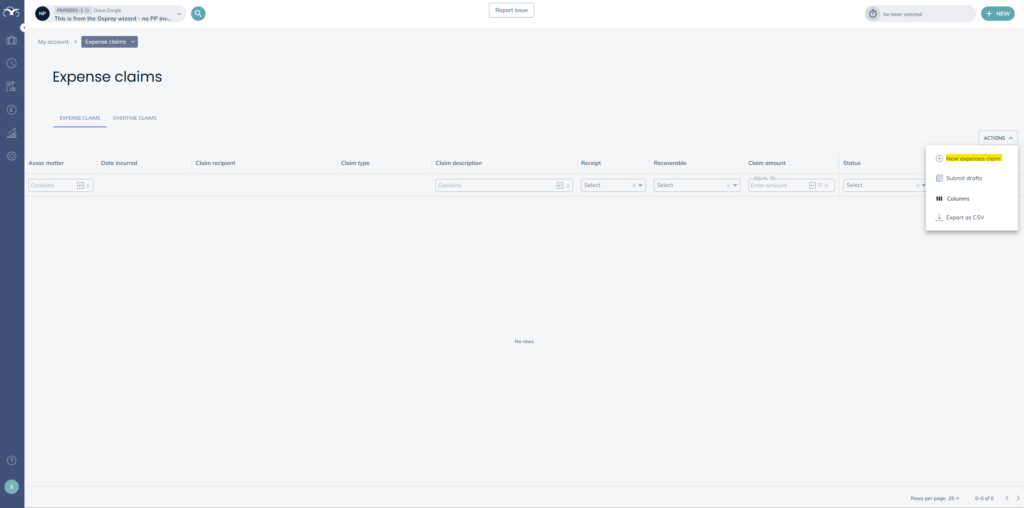
To submit a new claim you will click the ACTIONS button and click ‘New expenses claim’. You will then see the below form. Populate the boxes and then click SAVE DRAFT.
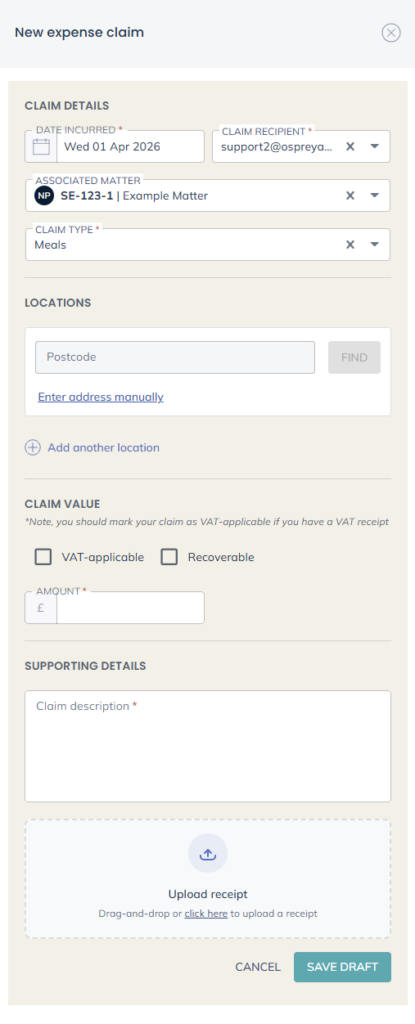
Date Incurred – This is the date that you incurred the expense. It will default to today’s date, but can be changed.
Claim Recipient – This is the user that the claim is for. It will default to the logged in user, but can be changed.
Associated Matter – If the claim is in relation to a matter you can link it here. If the claim is linked to a matter the ‘Recoverable’ tick box will appear below.
Claim Type – These are preset claim types that can be added by Ospreys technical team. These are linked to a nominal so that nominal ledger postings can be made.
Locations – This can be added to provide more information surrounding the claim.
Journey Details (If Applicable) – If Mileage is selected as Claim Type then you will see the One-way and Return tick boxes appear as well as a Total Miles box to enter the mileage.
VAT-applicable – If you tick VAT-applicable it will split the gross, net and VAT amount based on 20% VAT rate.
Recoverable – If you tick Recoverable, a posting will be made on the client ledger so that it can be picked up on a bill, as well as on the corresponding nominal ledger. An expense voucher document is also added to the matter history if a claim is added as recoverable along with any attached receipts.
Amount – This is where you enter the value for the claim you are submitting. If you selected Mileage, this box will automatically populate based on the miles and the rate per mile. For any other claim types you enter the amount.
Supporting Details – This is a free type text box that allows you to add some information surrounding the claim that you are submitting.
Upload receipt – If you have a physical receipt you can upload a copy of this here.
Submitting an Expense Claim
Once you have recorded your expense claim, it will sit as a draft. You can leave these as a draft for as long as you like, before eventually submitting them. To submit your draft claims, click the ACTIONS button and then ‘Submit Drafts’.
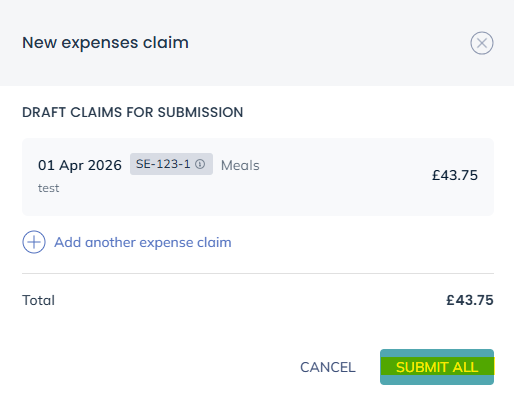
After clicking this, a side panel will appear with the list of your draft submissions. From this side panel you can record additional drafts as well as edit or delete current drafts by hovering over the specific draft. You will also see a total amount for the draft expenses you are about to submit.
When you are ready to submit, click the ‘Submit All’ button. These can then be picked up within the Accounts menu by somebody with the relevant permissions. Once submitted, this area will show SUBMITTED instead of DRAFT.
Approving Expense Claims
Once submitted, expenses will then appear in the Accounts menu under Employee Claims > Expense Claims. If you have the Process Expense claims section of your access template ticked, you will have access to this area and access to approve the claims. You will then be able to click on any individual claim and you will see the review screen.
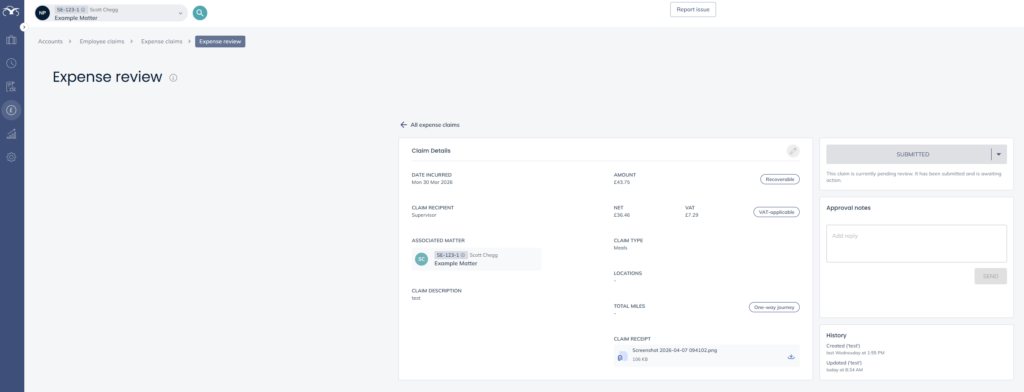
The review screen allows anybody with access to see all the details of the claim that has been submitted. If receipts are attached, it would allow the user to download and view the receipt.
The approver can amend the claim if needed, by clicking the pencil icon.
The approver can add any relevant notes in the Approval Notes section e.g. if they are changing the status to ACTION REQUIRED they can write notes on what is needed.
The approver can now move the claim from SUBMITTED to one of the other available status’
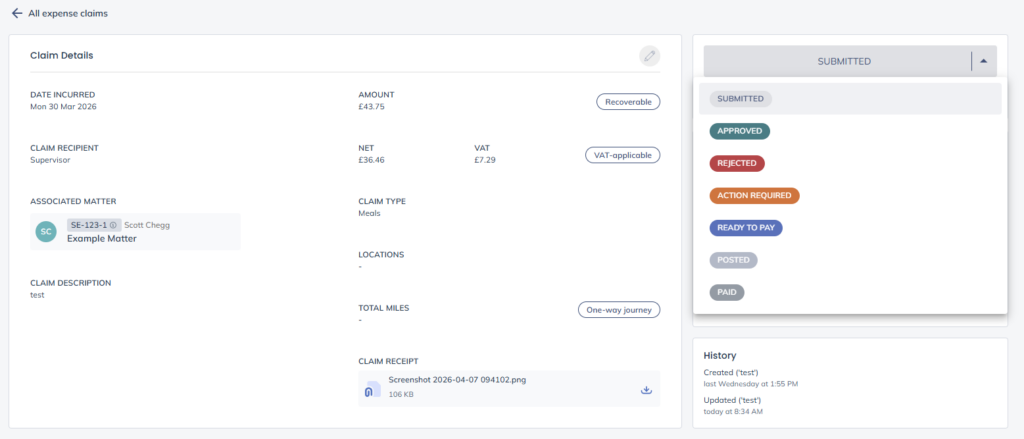
SUBMITTED – This changes the status “pill” to SUBMITTED. The claim is currently pending review, it has been submitted and is awaiting action.
APPROVED – This changes the status “pill” to APPROVED. The claim has been reviewed, accepted and approved.
REJECTED – This changes the status “pill” to REJECTED. The claim has been reviewed, declined and rejected.
ACTION REQUIRED – This changes “pill” to ACTION REQUIRED. The claim has been reviewed, but requires additional information or correction before it can proceed.
The above 4 statuses can be changed between each other freely e.g. a claim can be changed from SUBMITTED to ACTION REQUIRED and then back to SUBMITTED and then to APPROVED.
READY TO PAY – This changes the status “pill” temporarily to READY TO PAY. The claim has been reviewed, approved, and is now waiting payment processing.
– If there is an associated client/matter and the claim was ticked as “Recoverable” then a posting will be made on the client ledger for that matter. It will be posted as a DISBNOM. There will also be a posting to the Nominal Ledger that is attached to the claim type e.g. for the MEALS claim type it will post to the nominal you have linked to it, for example the Meals Nominal.
A few seconds after changing the status to READY TO PAY it will make these postings automatically in Osprey and then change the “pill” to POSTED.
– If there is an associated client/matter and the claim was not ticked as “Recoverable” then no posting will be made on the client ledger, but the nominal posting will still be made. A few seconds after changing the status to READY TO PAY it will make the nominal posting automatically in Osprey and then change the “pill” to POSTED.
– If there is no associated client/matter then the system cannot automatically make any postings. A “toast” message will pop up to inform the user they will need to make any postings manually.
POSTED – This can only be selected manually if the user changes the status to READY TO PAY and there is not an associated client/matter. This can be used once the user has made the manual postings.
If there is an associated client/matter and the user changes the status to READY TO PAY, a few seconds after doing that, the system will make the postings and the status will automatically be changed to POSTED.
Once this status is applied, automatically or manually the status can no longer be changed to any of the above.
PAID – This changes the status “pill” to PAID. The claim has been processed and payment has been made to the claimant.
Recording a draft Overtime claim
Claims are added within the User Profile account menu in the bottom left corner of Osprey
When you click into Overtime claims you will see all the claims that you have added to the system. As you have accessed this from your user profile, you will only see your claims or claims that you have submitted.

To submit a new claim you will click the ACTIONS button and click ‘New overtime claim’. You will then see the below form. Populate the boxes and then click SAVE DRAFT.
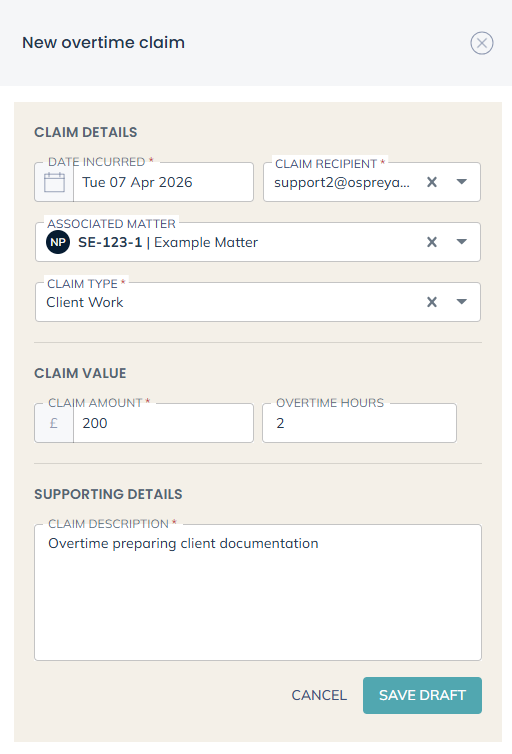
Date Incurred – This is the date that you incurred the expense. It will default to today’s date, but can be changed.
Claim Recipient – This is the user that the claim is for. It will default to the logged in user, but can be changed.
Associated Matter – If the claim is in relation to a matter you can link it here. If the claim is linked to a matter the ‘Recoverable’ tick box will appear below.
Claim Type – These are preset claim types that can be added by Ospreys technical team.
Locations – This can be added to provide more information surrounding the claim.
Journey Details (If Applicable) – If Mileage is selected as Claim Type then you will see the One-way and Return tick boxes appear as well as a Total Miles box to enter the mileage.
Claim Amount – Amount that you are requesting
Overtime Hours – Amount of overtime hours that you worked.
Supporting Details – Any extra information that you want to provide regarding the claim.
Submitting an Overtime Claim
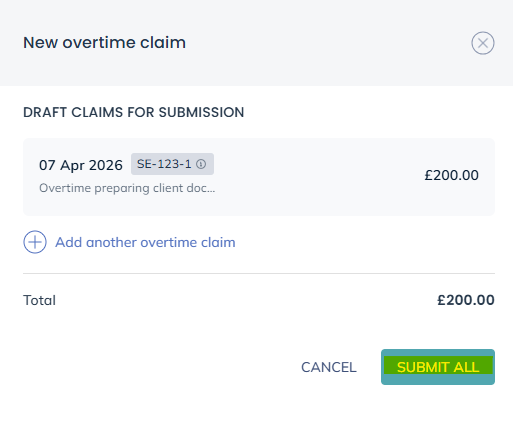
Once you have recorded your overtime claim, it will sit as a draft. You can leave these as a draft for as long as you like, before eventually submitting them. To submit your draft claims, click the ACTIONS button and then ‘Submit Drafts’.

After clicking this, a side panel will appear with the list of your draft submissions. From this side panel you can record additional drafts as well as edit or delete current drafts by hovering over the specific draft. You will also see a total amount for the draft overtime claims you are about to submit.
When you are ready to submit, click the ‘Submit All’ button. These can then be picked up within the Accounts menu by somebody with the relevant permissions. Once submitted, this area will show SUBMITTED instead of DRAFT.
Approving an Overtime Claim
This is a very similar process to approving expense claims however with overtime claims there are no automated postings.
Once submitted, overtime claims will then appear in the Accounts menu under Employee Claims > Overtime Claims. If you have the Process Overtime claims section of your access template ticked, you will have access to this
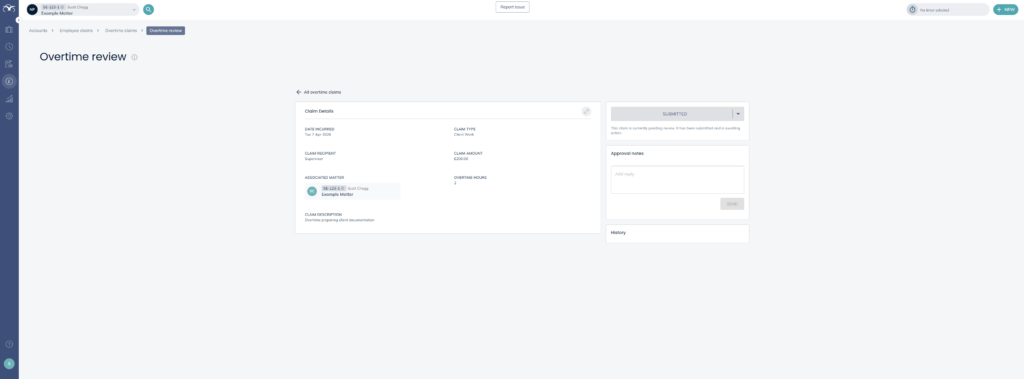
The review screen allows anybody with access to see all the details of the claim that has been submitted.
The approver can amend the claim if needed, by clicking the pencil icon.
The approver can add any relevant notes in the Approval Notes section e.g. if they are changing the status to ACTION REQUIRED they can write notes on what is needed.
The approver can now move the claim from SUBMITTED to one of the other available status’
SUBMITTED – This changes the status “pill” to SUBMITTED. The claim is currently pending review, it has been submitted and is awaiting action.
APPROVED – This changes the status “pill” to APPROVED. The claim has been reviewed, accepted and approved.
REJECTED – This changes the status “pill” to REJECTED. The claim has been reviewed, declined and rejected.
ACTION REQUIRED – This changes “pill” to ACTION REQUIRED. The claim has been reviewed, but requires additional information or correction before it can proceed.
READY TO PAY – This changes the status “pill” to READY TO PAY. The claim has been reviewed, approved, and is now waiting payment processing.
The above 5 status’ can be freely changed between them e.g. a claim can go from SUBMITTED to ACTION REQUIRED then back to SUBMITTED then APPROVED and then READY TO PAY.
POSTED – This changes the status “pill” to POSTED. The claim has been processed and recorded in the system (manually) but payment has not yet been issued. Once this status is selected you can no longer change the status to any of the above 5.
PAID – This changes the status “pill” to PAID. The claim has been processed and payment has been issued to the claimant.
TOIL AGREED – This changed the status “pill” to TOIL AGREED. The claim has been reviewed and approved from Time Off In Lieu (TOIL) instead of monetary reimbursement.
The above 3 status’ can be freely changed between them.