Adding a New Client (App)
Updated Jul 26th, 2024
Who is this guide for?
Any Users
This guide will take you through adding a new client on the case management app
To add a new client, navigate to Clients & Matters

Select Client Details from the options at the top of the screen

Choose from Add Individual Client (if your client is an individual) or Add Company Client (if you are undertaking work for a company).

Main Client Name
Enter all of the details you have to hand for the client themselves. If you chose New Company File, there will be less fields to enter:

Prospect – ticking this box will cause the client to be added as a prospect, use this if you are unsure whether the client is going to instruct you – no financial postings can be made to prospect matters, but you can time record, send letters etc. The matter can be made live once you are instructed, or archived if the client decides on another firm of solicitors. Making a Prospect File Live
High Risk – ticking this box ensures that each time a matter is added/edited for this client a warning will appear advising the operator that the client is high risk.
Additional Clients – You can add up to an additional 4 client names to each client in Osprey, so if your client is a company with 3 directors, you could enter these 3 directors as additional client names against the company as the main client, or if your clients are a couple buying a house you can enter both the lead and second clients details.
Account Address and Billing Address – This section allows you to enter both an account address and a billing address for your main client (additional client addresses can be added in the Additional Named Clients section). When you print a bill from Osprey, if there is a Billing Address, this is displayed on the bill. If not, the Account Address is used.
Additional Details – If you wish to set credit limits at Client level (these will then apply to all matters relating to this client) you can do so here. Credit limits can also be set at matter level for each matter the client has open with you. If you are using Group codes to group your clients together, select one here. Group codes can be set up by a Supervisor user – see our guide here for information on how to do this.
Client Extension – Your firm may have set up Client Extensions to capture other information required. These will appear at the foot of the Add Client page.
Communication Details
On clicking save, the communications details screen will appear:

Here, you can add any phone, fax, mobile or DX numbers you have for the client.
- Choose Add phone.
- Edit the description if required.
- Add the phone number to the Info field.
- If this is the main number that the client would prefer you to contact them on, tick the Main No box.
- Click Save.
Repeat the above steps until you have entered all numbers, and then click Finish.
Matter Details
The Matter Details screen will now appear. Here, we will set up the details of the work to be carried out on behalf of the client.
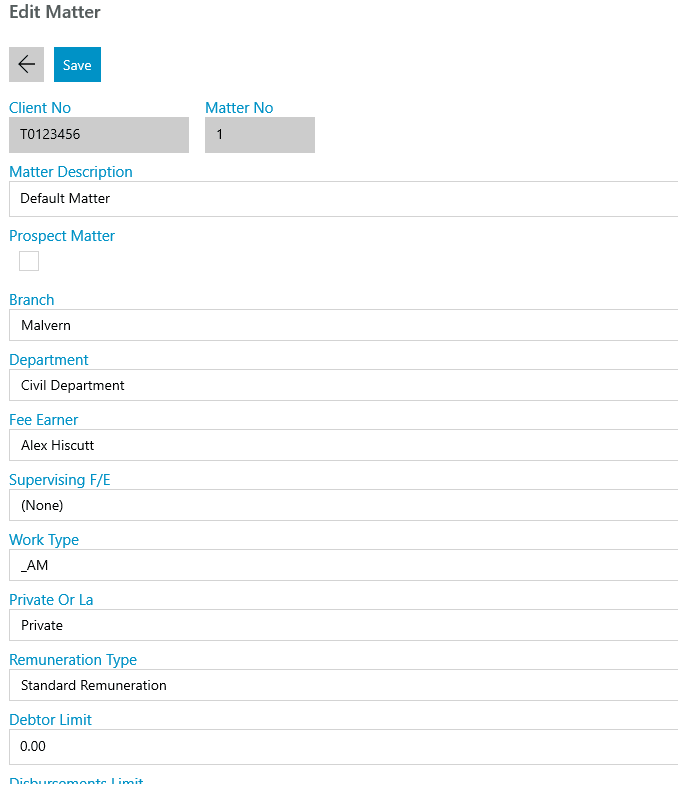
Client and Matter No – These will be pre-populated. As we are adding a new client, the matter number will default to 1.
Matter Description – Enter the detail of the work to be carried out here, e.g. Divorce, Purchase of property, Will etc.
Prospect Matter – Tick this box if the matter is a prospect.
Branch and Dept – Ensure these are set correctly. Branch and Department cannot be changed once there are financial postings on the matter until the matter balances are zeroed.
Fee Earner – Choose the Fee Earner who will be dealing with this matter.
Supervising F/E – Choose a supervising fee earner if there is one.
Work Type – Select from the list of available work types.
Private or LA – Select from Private or Legal Aid. If the matter is set to Legal Aid, additional options will appear:
- Franchise Category – Choose from a list of available franchise categories. Provided these have been set up in Supervisor > Code Setup > Franchise Categories with a franchise type of Civil or Crime, the UFN field will then appear.
- Unique File No (UFN) – To set a UFN on a matter, ensure the correct instruction date is selected alongside the UFN box, or choose it using the calendar icon, then click the UFN button, which will generate a UFN e.g. 10072002/001
- LA Version (Legal Aid version) – Setting the UFN above will correctly select the legal aid rates set based on the date at which the instruction was taken. If not using UFNs, please manually select the latest available rate for new files.
Remuneration Type – Select the remuneration type applicable to this matter. This will determine the time posting rates which will apply to this matter when your fee earners time record. Legal Aid remunerations are maintained within Osprey as per the guidance issued by the LAA.
Debtor, Disbursements and WIP Limits – If you wish, enter credit limits here for the matter. Warnings will be triggered by default at 75% of the limit set when time recording (for WIP limit) or entering financial postings (for Debtors/Disbursements limits).
Date Opened – Enter the date that the client first instructed you on this matter. The Date Opened will default to today, but if your fee earners need to time record on this matter on a date earlier than today, set this to the first date that any work was carried out. Financial and Time entries can only be posted with a date on or after the matter opened date.
Date Completed – This date is filled when a workflow is completed on the matter.
Date Archived – This date is filled when the matter is archived on completion.
Review Date/Type/Period – You can set matters to automatically review at set time periods. These will appear on the fee earners’ Osprey Home screens. See our Set Matters for Review guide for assistance in understanding how the reviews work.
Email – Enter an optional additional email address for the client here.
Load Default Workflow – Tick this box if you wish to load the default workflow assigned to the work type you have chosen.
Create Label – this tick box will appear if you have Label Printing switched on. Ticking this box will generate a printable label based on your custom template.
Click Save when you are finished, and the new client’s matter will be displayed.