Creating Document Bundles with Bundledocs
Updated Oct 15th, 2026
Who is this guide for?
Any Users
This guide will show you how to create, manage and share court bundles from inside Osprey using the Bundledocs integration
Released October 2026
Osprey now connects to Bundledocs, so you can build a bundle straight from a matter’s documents without downloading and re-uploading files. What’s new:
- Document bundles screen: a new screen, under MORE in the Matter Workspace, lists every bundle created for that matter.
- New bundle wizard: set up the bundle, add sections, and fill each section from Matter History or from your computer.
- Open in Bundledocs: jump straight to the bundle in Bundledocs to paginate, index and finalise it.
- Download bundle: save the finished bundle as a PDF.
- Upload bundle to matter history: file the finished bundle back against the matter in one click.
- Edit and delete: change a bundle’s description, sections or documents later, or remove it.
Before you start
The integration is switched off by default. You need three things before you can use it:
- A Bundledocs subscription: your firm needs its own Bundledocs account, and each user who builds bundles needs a Bundledocs login. Bundledocs sets these up with you.
- The integration switched on: contact Osprey Support and ask for the Bundledocs integration to be enabled for your firm. Until then, Document bundles does not appear under MORE or under NEW > Document.
- Pop-ups allowed for Osprey: the first time you use Bundledocs, Osprey opens the Bundledocs sign-in page in a new browser tab. If your browser blocks pop-ups, allow them for your Osprey site.
Signing in to Bundledocs: you do not need to sign in before you start. The first time you save a bundle, or use an action that needs Bundledocs, a new tab opens with the Bundledocs sign-in page. Sign in there, and Osprey carries on automatically. You have about 30 seconds to sign in. If you take longer, close the tab and click the button again.
Creating a document bundle
You can start a new bundle in either of two ways:
- From a matter: open the matter’s Matter Workspace, click MORE > Document bundles, then click ACTIONS > New bundle.
- From anywhere: click NEW at the top right of the screen, then Document > Document bundle.
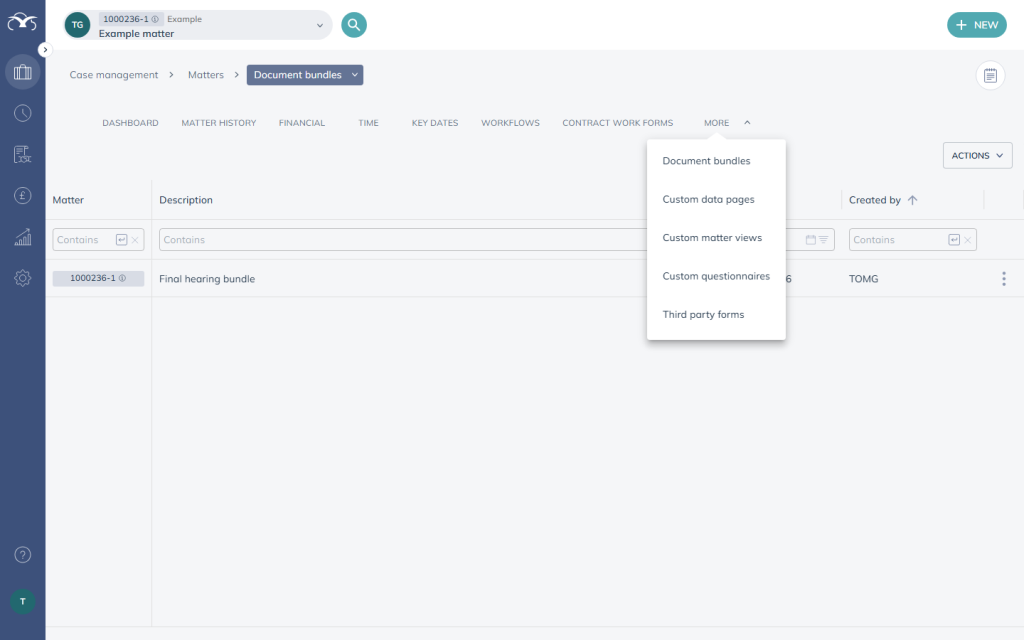
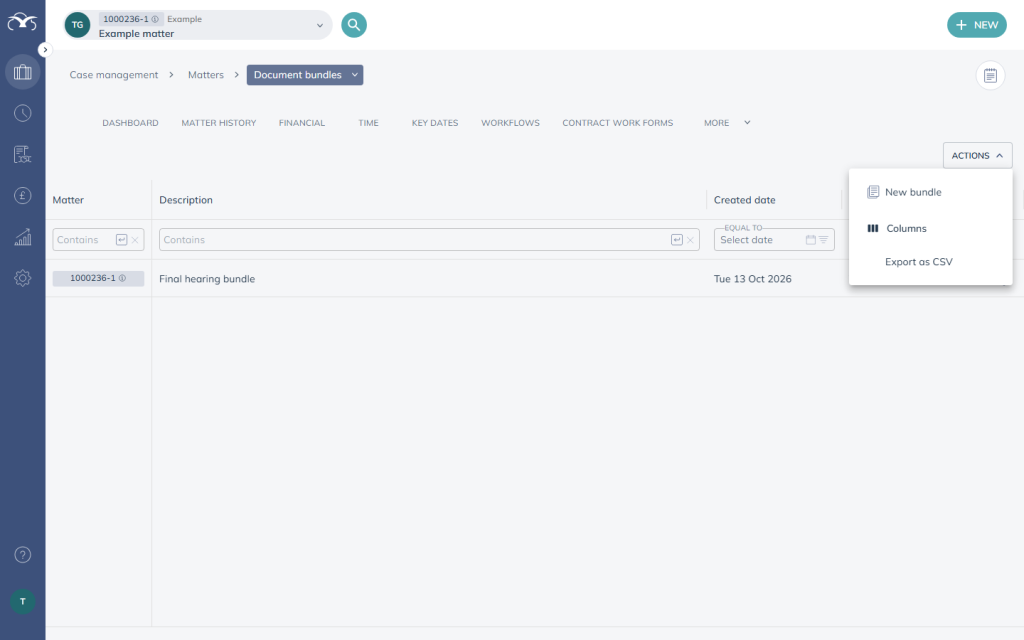
Document bundle details
This first step sets up the bundle and its sections.
- Client and matter: type a client number or name and select the matter. Matter no fills in automatically.
- Bundle description: required. Describe the bundle, for example “Final hearing bundle”. You can use up to 512 characters.
Under Sections, click Add Section once for each section the bundle needs, such as Pleadings, Witness Statements and Correspondence. For each section:
- Type its name in Section name. Each section name must be unique within the bundle.
- Use the up and down arrows to change the order.
- Click the cross to remove a section, or click Delete all sections to start again.
You don’t need every section now. You can add more later by editing the bundle.
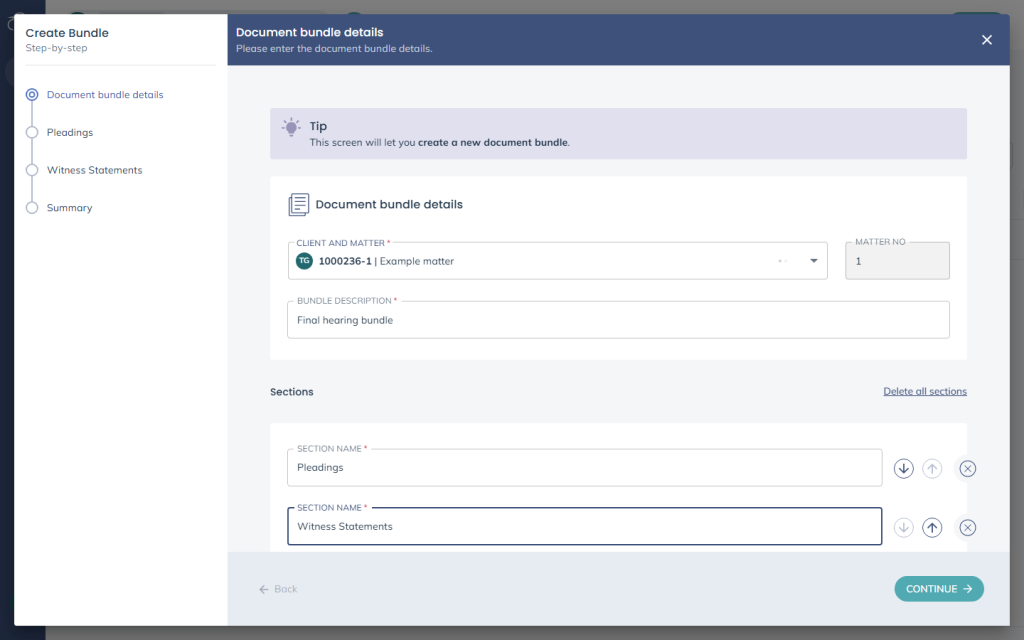
Click CONTINUE. Osprey creates the bundle in Bundledocs and shows its progress. If you have not signed in to Bundledocs yet, the sign-in tab opens at this point.
Default Bundle Section: Bundledocs adds a section called Default Bundle Section at the top of every new bundle, before the sections you named. You can add documents to it, or leave it empty and click CONTINUE.
Adding documents to each section
The wizard now shows one step for each section, listed down the left-hand side. Each step has two panels:
- Section documents (left): the documents already in this section.
- Matter documents (right): the documents saved in the matter’s Matter History.
To add a document from the matter, hover over it in Matter documents and click the Add attachment icon that appears on the right. Use the Search box to find a document by name.
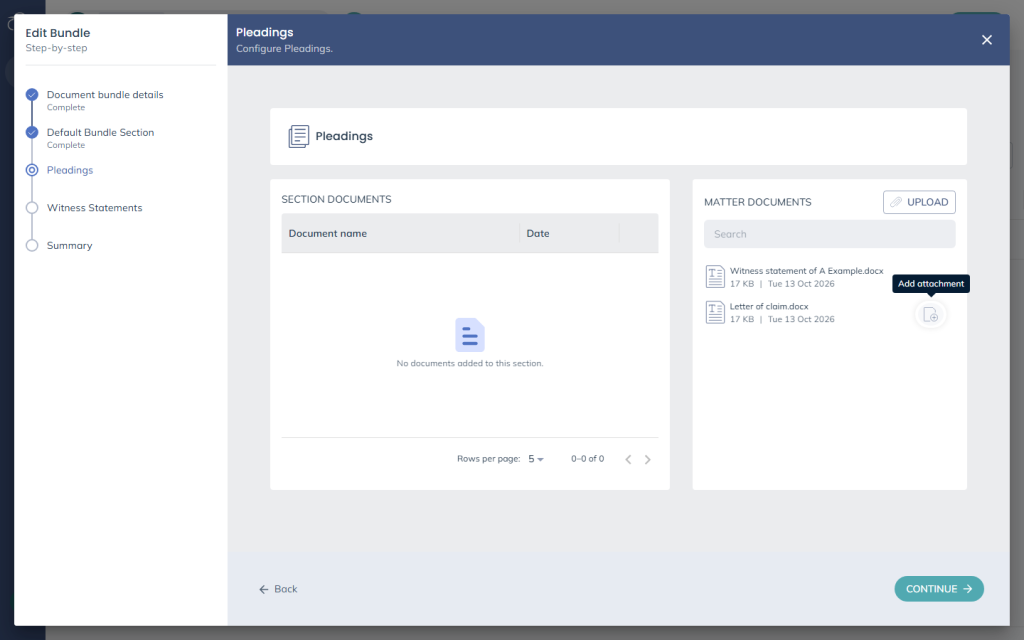
The document then appears under Section documents. To remove it, click the cross next to it.
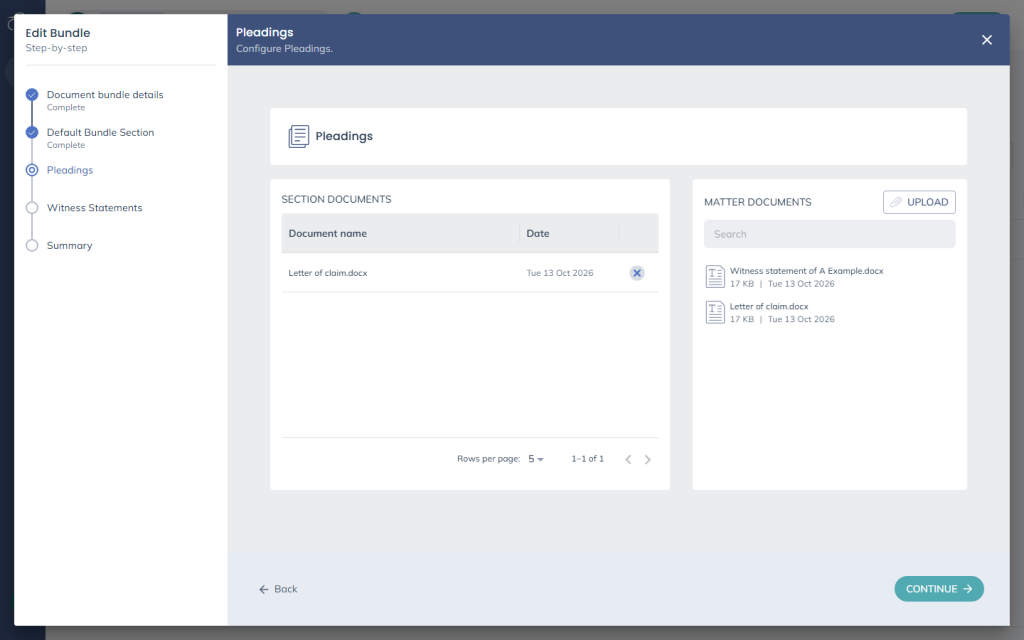
To add a document from your computer, click UPLOAD and choose one or more files.
Ordering documents is done in Bundledocs: you can reorder sections in Osprey, but not the documents within a section. To change the order of documents, open the bundle in Bundledocs and reorder them there.
When the section is complete, click CONTINUE. The documents are sent to Bundledocs and the next section opens. Click Back to return to an earlier section.
Finishing
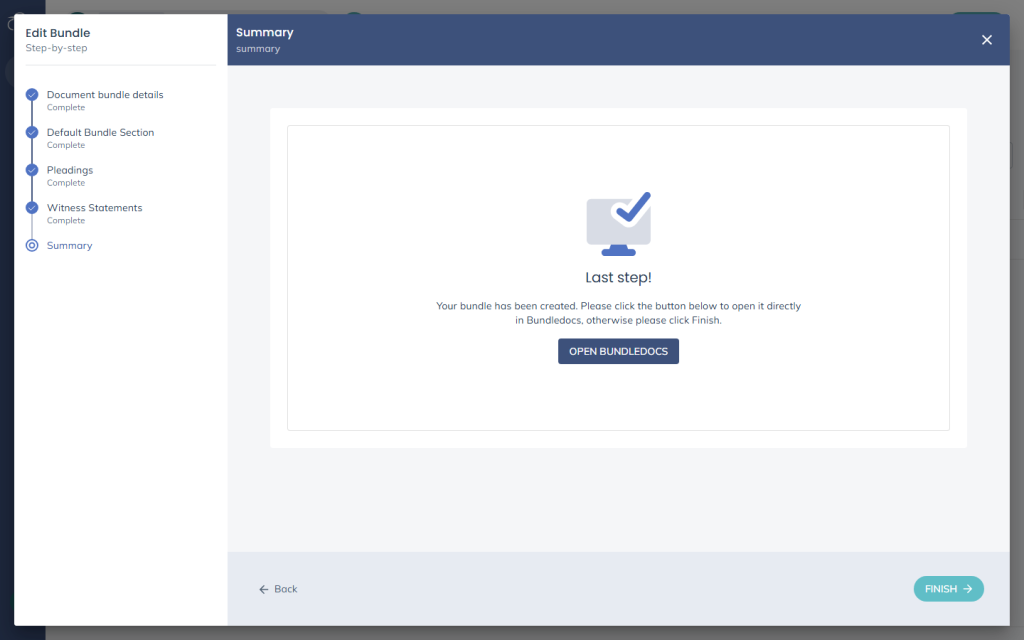
The Summary step confirms that your bundle has been created.
- Click OPEN BUNDLEDOCS to open the bundle in Bundledocs. There you can reorder documents, paginate, index, add cover pages and finalise the bundle.
- Or click FINISH to return to the Document bundles screen.
Managing existing bundles
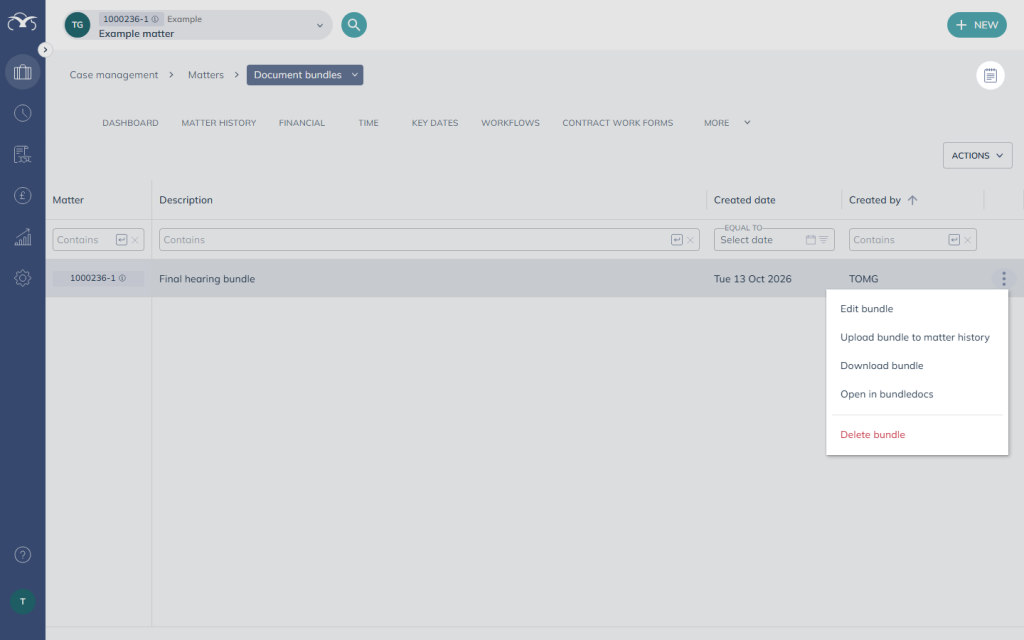
The Document bundles screen lists every bundle for the current matter, with columns for Matter, Description, Created date and Created by. Use the boxes under each column heading to filter the list. Click a bundle’s description to edit it.
Click the ⋮ (more actions) button at the end of a row to:
- Edit bundle: Reopen the wizard to change the description, add new sections, or add or remove documents in each section. Click SAVE CHANGES on the first step to keep your changes.
- Upload bundle to matter history: Save the compiled bundle PDF to the matter’s Matter History. A message confirms “Bundle added to matter history”.
- Download bundle: Download the compiled bundle as a PDF.
- Open in bundledocs: Open the bundle in Bundledocs in a new tab.
- Delete bundle: Remove the bundle. You are asked to confirm first.
Finish in Bundledocs first: Reordering, pagination, indexing and other finishing touches are all done in Bundledocs. Download the bundle, or upload it to Matter History, only once you have finished there, so that the PDF you file is the final version.
Troubleshooting
I can’t see Document bundles under MORE, or Document bundle under NEW: The integration has not been switched on for your firm. Contact Osprey Support.
“You must authenticate with Bundledocs before performing this action.”: Osprey could not confirm your Bundledocs sign-in. Check that the sign-in tab opened and was not blocked as a pop-up. Then sign in within about 30 seconds and try again.
The sign-in tab says “Bundledocs authentication failed”: Close the tab and try again. If it keeps failing, check your Bundledocs username and password with your firm’s Bundledocs account owner.
Continue does nothing on the first step: A matter and a bundle description are both required. Fill in both.
“Section name must be unique”: Two sections have the same name. Rename one of them.
A document won’t add to a section: Try again. If the problem continues, download the file from Matter History and add it with UPLOAD instead.