Setting Up Matter History Item Permissions
Updated Mar 24th, 2026
Who is this guide for?
Accounts Supervisors, Case Management Supervisors and System Supervisors
You can setup permissions on documents in the Osprey matter history for groups or users. This guide will take you through this process
You are able to set up security groups to allow certain departments (e.g. Conveyancing, Accounts, etc) to view documents relevant to them.
Set up security groups
Security groups enable you to group your users together to make it easier to apply permissions to documents. You could set these up as departments to ensure that staff in your conveyancing team are unable to view documents for family matters for example, or the groups could be designed around your staff members’ seniority.
Navigate to your ‘Supervisor’ area and then select ‘System Setup’. Now Select ‘Security Groups’. Click ‘Add Group’ and select ‘New’ at the top of the screen to bring up the following area:
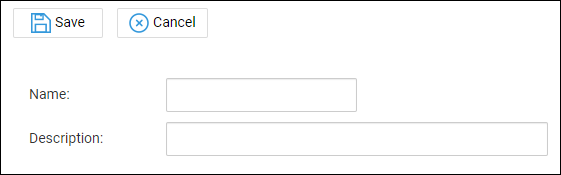
Enter an appropriate name for your Group. For example, ‘Conveyancing Team’ or ‘All Staff’ and then enter a description, which would generally be the same as the name of the group. Select ‘Save’ and repeat for any further groups as required.
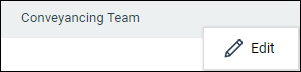
Users now need to be linked to any new groups which have been created. Right click on the group you want to link users to and select ‘Edit’.
Tick the box to the left hand side of a user’s name to link to the selected group, repeat as required and click ‘Save’. Please note that this list of users will include supervisor users and therefore they will still have full permissions to documents.

You also have the ability to set document permissions for an entire matter. Please note that you must be linked to the supervisor template to be able to set matter level permissions.
Setting document permissions on a matter
Navigate to a client’s matter history and select the ‘Set Permissions’ button to bring up the permissions screen.
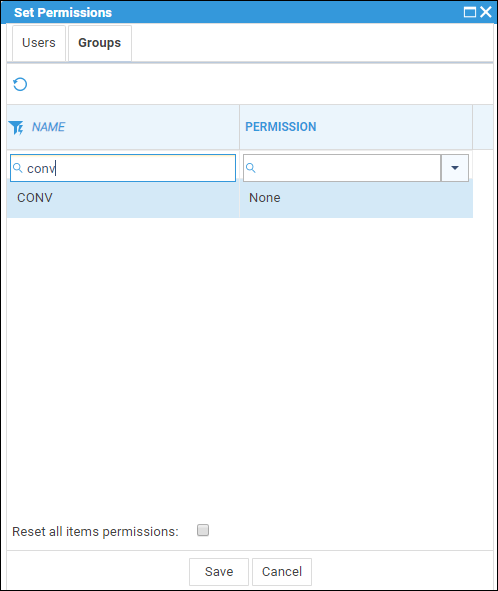
Select the ‘Group’ tab to show your available groups, which will have the default permission of ‘All’. Click on the ‘Permission’ column to bring up a drop-down list of options.
- None: Selecting this option will allow only an Owner and Supervisor user to be able to see the item in a matters history, items will be hidden from all other users.
- Read Only: Selecting this option will allow selected users or groups read/view only access (other than supervisor users or item owners).
- Read/Write: Selecting this option will allow selected users or groups both read/view and edit options on relevant items. (Other than supervisor users or item owners).
Tick the ‘Reset all item permissions’ box if you wish the matter permissions to apply to all existing items in the matter history. Leave this unchecked ONLY if you wish the permissions to take effect on newly added matter history items.
Select ‘Save’ to keep your changes.
Please note that if you are selecting permissions per user, the available user list will only display users in the system whom are not supervisor users as supervisors automatically have full permissions).
You are also able to amend matter level permissions for groups or users. Select the ‘Permissions’ tab.
To amend Group or User Permissions select the Individual or Group Tab and amend as previously explained and ensure you select ‘Save’ to retain any changes.
It is possible to set permissions against individual Items. Please note that only owners of items and supervisor users can amend permissions
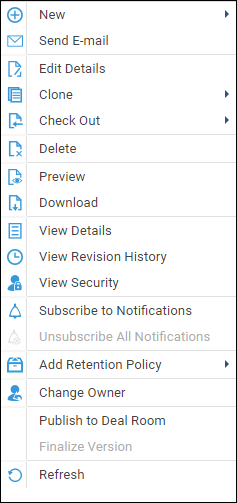
In the matter history, right click the item and then select ‘View Security’.
The below panel will appear to the right hand side of the screen displaying the current ‘User’ or ‘Group’ permissions set against the selected item.
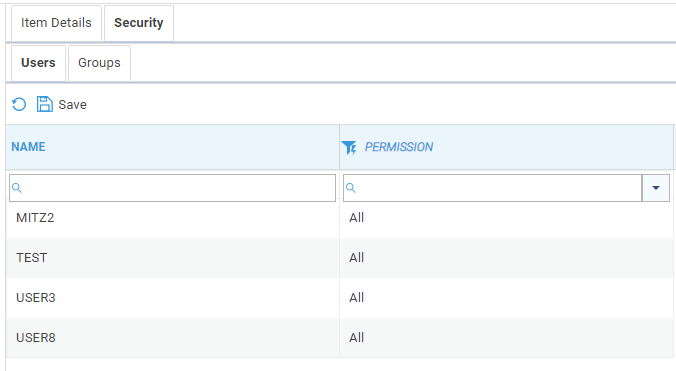
Click the relevant name to highlight it. Now click anywhere to the right of the selection to reveal the permission options and select a suitable permission level. Repeat for any further groups or users and then select ‘Save’.
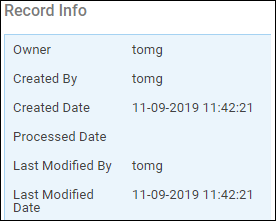
To view the current ownership of an item, right click it and then select the option to ‘View Details’.

The below panel will appear to the right hand side of the screen. Under the heading of ‘Record Info’ you will be able to see the current owner.
To amend the owner, right-click the item in question and select ‘Change Owner’.

Select the current Owner’s new permission level by selecting an option from the ‘Current Owner Permissions’ drop down list.
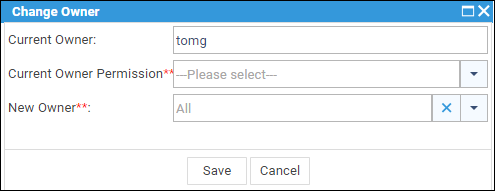
Select a new owner from the ‘New Owner’ drop down menu and then select ‘Save’. The permissions for the original owner of the item will now be set and the new owner will have full permission.
IMPORTANT NOTES:
By default, full permissions will be granted on all newly added items and existing historical items. Unless an owner (the user whom created/added) of an item sets specific permissions. Or a supervisor sets permissions on either all history items for a particular matter or individual items.
If Permissions have been set on a matter, any item in the matter history will automatically grant full permissions to the owner (creator). Permissions MUST be set on the item for other members of staff to be able to view/edit. If no permissions are set, it will only be visible to the owner or to any user who has supervisory access.
A supervisor user can over-ride the permissions set on matters. They can do this by granting either No access, Read Access or Read and Write access to all historical items.