Using and Formatting Fields in Word
Updated Mar 24th, 2026
Who is this guide for?
Case Management Supervisors
This guide will take you through how to format mergefields in Microsoft Word
Within Osprey’s standard documents, it is possible to use standard Word fields as well as formatting these and your Osprey merge fields in the way you want to.
The most common question we are asked is why numbers or currency fields in Osprey standard documents display with 4 decimal places. Numbers are stored in the database with 4 decimal places, but you can use the number formatting switch to display these as you wish, even including the currency symbol.
When you view the MergeField field in your document, the syntax looks like this: { MERGEFIELD Client_name }. By adding a switch, we can customise how the document displays this information.
For example, { MERGEFIELD Client_name \*Upper} will display the client name from within Osprey and display it in upper case within the Standard Document.
Number Mergefield Switches
| \# £#,##.00 | Displays a number as £0,000.00 |
| \*CardText | Displays numbers as text (for numbers over 999,999, please follow the below guide https://support.ospreyapproach.com/guides/converting-numbers-to-text-within-word/) |
Number Mergefield Switches Examples
| Format | Example | Output |
|---|---|---|
| \# £#,##.00 | {MERGEFIELD Cost \# £#,##.00} | £123,456.00 |
| \*CardText | {MERGEFIELD Cost \*CardText} | One hundred |
Text Mergefield Switches
| \b “TEXT” | Specifies the text to be inserted before the MergeField field if the field is not blank |
| \f “TEXT” | Specifies the text to be inserted following the MergeField field if the field is not blank |
| \f “SHIFT + ENTER” | Specifies the text to be inserted on the next line following the MergeField field if the field is not blank. |
| \* Upper | Displays the MergeField in uppercase |
Text Mergefield Switches Examples
| Format | Example | Output |
|---|---|---|
| \b “TEXT” | { MERGEFIELD Name1 } { MERGEFIELD Name2 \b ” and ” } | Name 2 is present = John and Joan Name2 is empty = John |
| \f “TEXT” | { MERGEFIELD HouseName \f “, “}{ MERGEFIELD HouseNum } | HouseName is present = The Bridges, 34 HouseName is not present = 34 |
| \f “SHIFT+ ENTER” | { MERGEFIELD HouseName \f “ “}{ MERGEFIELD HouseNum \f “ “}{MERGEFIELD HouseRoad} | HouseName, HouseNum and HouseRoad are present = The Bridges 34 Church Road HouseName is not present = 34 Church Road HouseName and HouseNum are not present = Church Road |
| \* Upper | {MERGEFIELD ClientName \*Upper} | JOHN SMITH |
Date & Time Mergefield Switches
| {QUOTE{DATE}} | Inserts the date that the document was created |
| \@ ” “ | This allows the formatting of the date |
| Day formats | d = Displays a single-digit day, dd = Displays a two-digit day, ddd = shows three letter abbreviation for day of the week dddd = displays full name of the day of the week |
| Month formatting | M = Displays single-digit months with no leading zero MM = Displays single-digit months with leading zero MMM = Displays a three-letter month abbreviation. MMMM = Displays the full month name |
| Year Formatting | yy = Displays a two-digit year number. yyyy = displays a four-digit year number. |
| Hours Formatting | h = displays single-digit hours based on 12-hour clock without a leading zero. hh = displays Single-digit hours based on 12-hour clock with a leading zero. H = displays single-digit hour based on 24-hour clock. HH = displays two-digit hour based on 24-hour clock. |
| Minute Formatting | m = Displays single-digit minutes without a leading zero mm = Displays single-digit minutes with a leading zero |
| AM/PM | Displays uppercase AM or PM |
| am/pm | Displays lowercase am or pm |
Date & Time Mergefield Switches Examples
| Format | Example | Output |
|---|---|---|
| \@ “dd MMMM yyyy” | {DATE \@ “dd MMMM yyyy”} | 07 April 2021 |
| \@ “HH:mm AM/PM” | {MERGEFIELD Time \@ “HH:mm AM/PM”} | 09:34 AM |
| \@ “MMM-yy” | {MERGEFIELD Date \@ “MMM-yy”} | Mar-21 |
| \@ “m ‘minutes'” | {MERGEFIELD Time \@ “m ‘minutes'”} | 6 minutes |
Emails
When looking to add an email field, you will need to add the merge field into the document first. Once added, highlight the relevant merge field, and navigate to Insert > Link.
On the popup window, select Email Address, and enter mailto: so it will look as below.
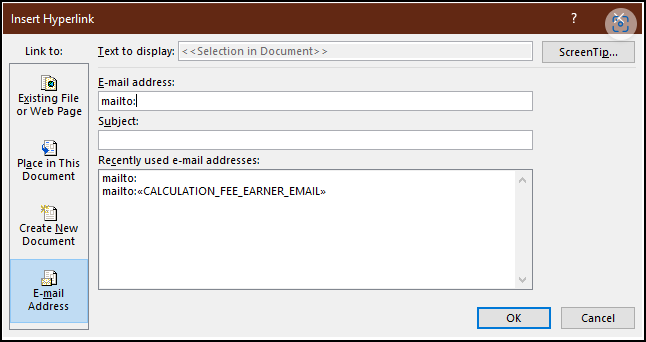
Once completed, select OK. A new hyperlink MailTo field will be shown within the word document.
Insert the same merge field again, this time right after the mailto: as seen below
| Format | Example | Output |
|---|---|---|
| {HYPERLINK “mailto:{EMAIL}”} | {HYPERLINK “mailto:{ MERGEFIELD FEE_EARNER_EMAIL}”} | support@pracctice.net |
Other Field Codes
For more help and a full list of field codes available in Microsoft Word, click here: List of field codes in Word (microsoft.com)