Civil Legal Aid in Osprey
Updated Oct 27th, 2026
Who is this guide for?
Any Users
This guide will show you how to set up and manage Civil Legal Aid matters in Osprey
Released October 2026
Osprey now supports Civil Legal Aid work end to end: linking a matter to its certificate, watching how much of the certificate has been used, recording enhanced time, claiming payments on account and exporting costs for the LAA. What’s new:
- Certificates: record each client’s Legal Aid certificates, with a funding limit, and link a matter to one.
- Fixed Fee: record a fixed fee against a Civil Legal Aid matter.
- Certificate position: see the certificate’s limit, used and remaining amounts on the matter, with a warning when usage reaches 80%.
- Escape Status: see whether a matter has reached the escape threshold.
- Legal Aid Enhancement %: add an enhancement to time recorded on the batch timesheet.
- POA / Interim Claim: tick WIP and confirm a payment on account or interim claim.
- Claim status on the Billing Guide: Legal Aid entries are labelled [Unclaimed], [POA/Interim Claimed] or [Finally Billed].
- CostsMaster export: download a CSV of a matter’s costs for CostsMaster.
Before you start
Nothing to switch on: Civil Legal Aid is available to every firm from the October 2026 release.
- A Civil franchise category: Civil Legal Aid features appear only on a matter set to Legal Aid with a franchise category of type Civil. Most firms have one called Civil (and Family is usually Civil type too). If you’re not sure which of yours qualify, contact Osprey Support.
- Legal Aid, not Private: a matter left as Private never shows the certificate, fixed fee or escape status fields.
- Pop-ups: Manage Certificates on the edit screen opens in a new tab, so allow pop-ups for Osprey.
- Warning threshold: the certificate warning shows at 80% used. To change that percentage for your firm, contact Osprey Support.
Setting up a Civil Legal Aid matter
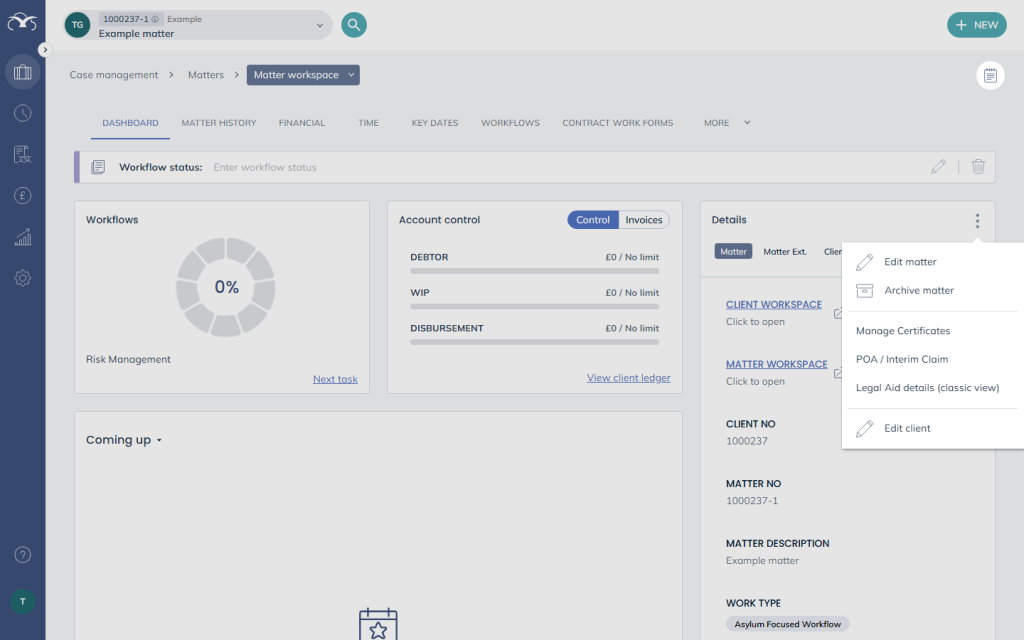
- Open the matter’s Matter Workspace, click … at the top right of the Details panel, then Edit matter.
- Set Private Or La to Legal Aid. The Franchise Category field appears.
- Choose a Civil franchise category, for example Civil. The Certificate and Fixed Fee fields appear.
- In Certificate, choose the client’s certificate, or leave it as None for now. To add one, click Manage Certificates next to it (see Managing certificates, below).
- In Fixed Fee, enter the fixed fee if the matter has one, for example 750.00.
- Click Save.
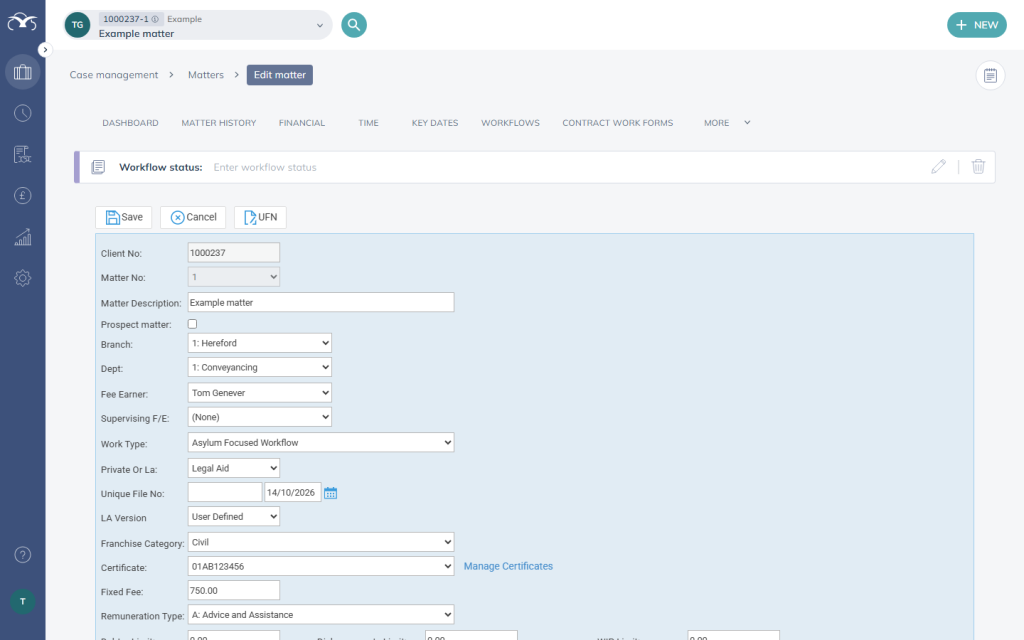
Fixed Fee format: enter a number up to 9,999,999 with no more than two decimal places. A negative amount or a third decimal place is rejected with a message before anything is saved.
Managing certificates
Certificates belong to the client, so every matter for that client can use them. Open the client’s certificates in either of two ways:
- From the Matter Workspace: click … > Manage Certificates.
- From the Edit matter screen: click Manage Certificates next to the Certificate field. It opens in a new tab.
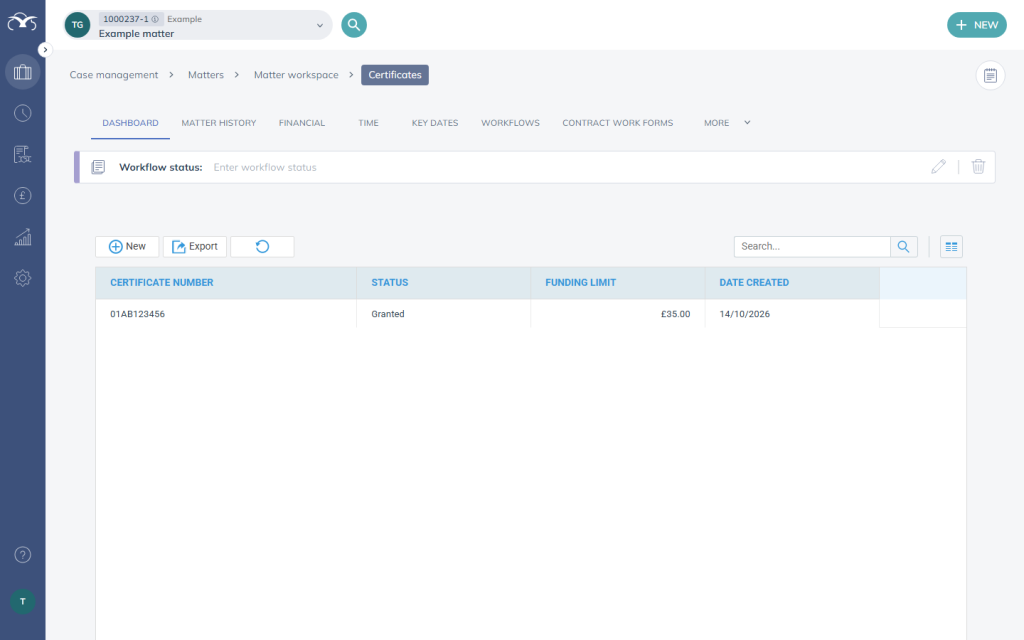
The list shows each certificate’s Certificate Number, Status, Funding Limit and Date Created.
Adding a certificate
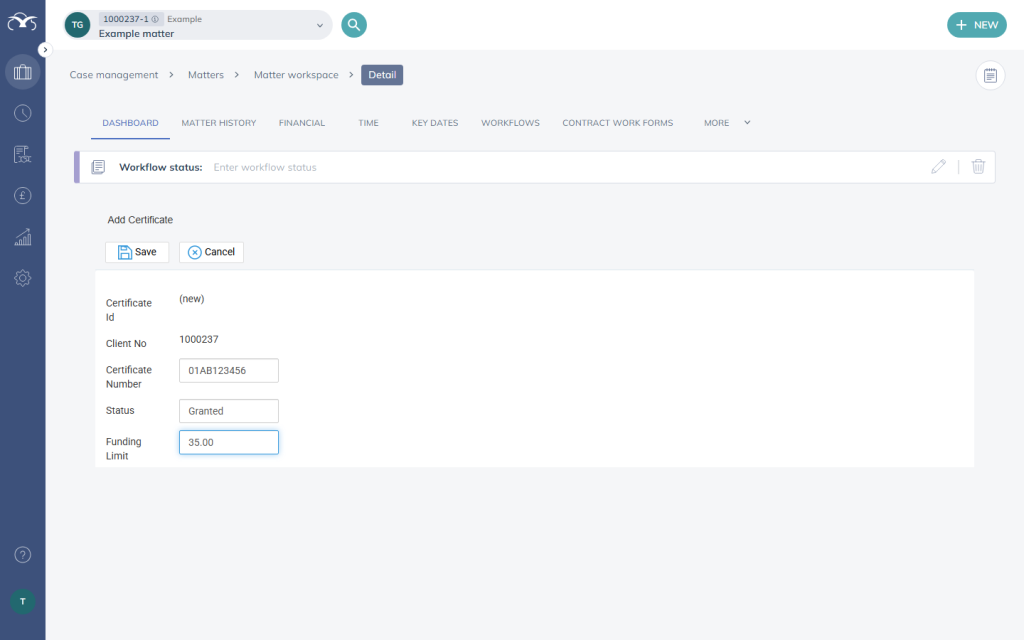
- Click New.
- Enter the Certificate Number (up to 20 characters), the Status (for example, Granted) and the Funding Limit. Osprey uses the funding limit to work out how much is used and remaining.
- Click Save. You return to the list, with the new certificate on it.
Editing a certificate
Right-click the certificate in the list and choose Edit. Once a matter is linked and time is posted, the edit screen also shows the certificate’s Used, Remaining, Used % and Remaining %.
Seeing the certificate position on a matter
On the matter, click … > Legal Aid details (classic view). For a matter with a linked certificate, you’ll see Certificate Limit, Certificate Used, Certificate Remaining, Certificate Used % and Certificate Remaining %.
When usage reaches 80% of the limit, a warning reads: “This matter’s certificate has reached or exceeded its warning threshold.” The warning doesn’t stop you posting time; it’s there so you can apply for an amendment in good time.
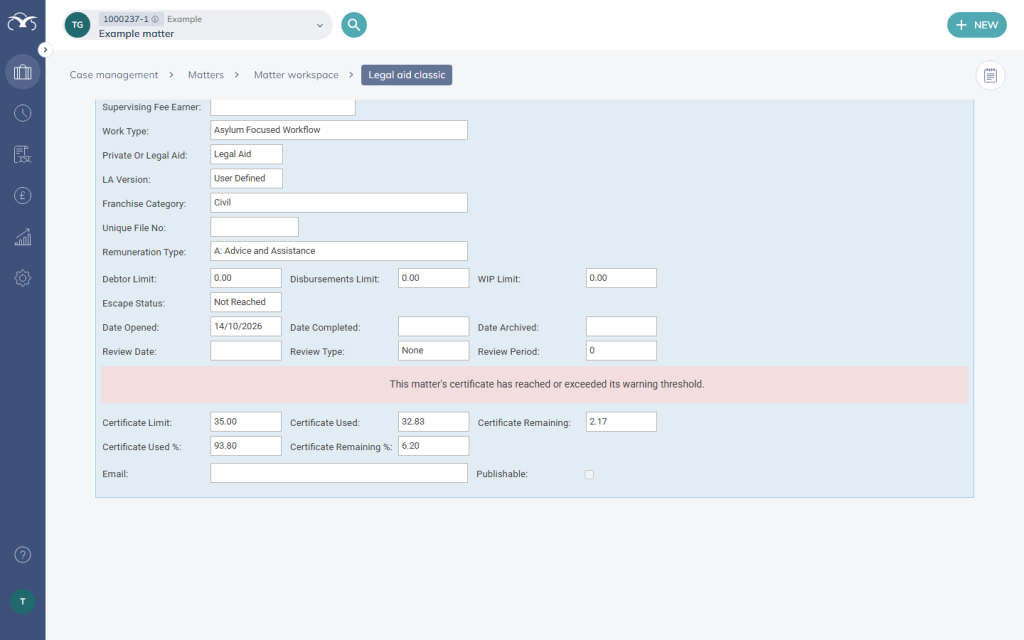
Recording time with a Legal Aid enhancement
The batch timesheet has a new Legal Aid Enhancement % column, for enhanced rates such as Court of Protection work.
- Go to Supervisor > Smart Actions > Timesheet.
- Click New Action, choose Timesheet as the Action Type, then click Ok.
- Click New to add a row. Double-click a cell to type in it, and press Enter to move on.
- Fill in Client No, Matter No, Fee Earner ID, Date, Remuneration ID, Activity ID and Time.
- In Legal Aid Enhancement %, enter the percentage, from 0 to 100.
- Click Save & Post to post the time now, or Save to keep the timesheet and post it later.
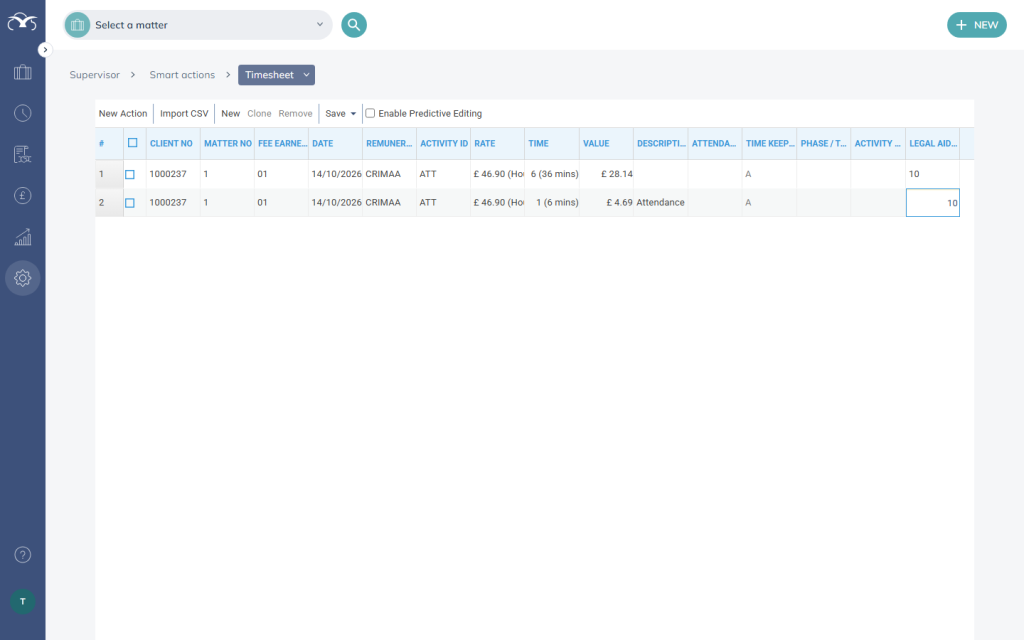
The column works only on Legal Aid matters: on a Legal Aid row, Legal Aid Enhancement % is available and Rate is greyed out. On a Private row it’s the other way round.
You enter the percentage; Osprey works out the amount: the enhancement value is the time value multiplied by the percentage, rounded to the penny. It’s kept whether you post straight away or save and post later.
Making a POA or interim claim
Use this screen to choose which WIP goes into a payment on account or interim claim.
- On the matter, click … > POA / Interim Claim. You can also use the POA / Interim Claim button on the classic matter page, which shows on Legal Aid matters.
- Choose a Selection Type to tick entries for you (To Value, By Date, By Activity, By Fee Earner, By Remun Type or All), or leave it on Manual and tick the rows yourself.
- Click Calculate total ticked. Value Ticked shows the total.
- Check the Claim Amount. Osprey fills in the Claim Reference when you confirm the claim.
- Click Confirm Claim.
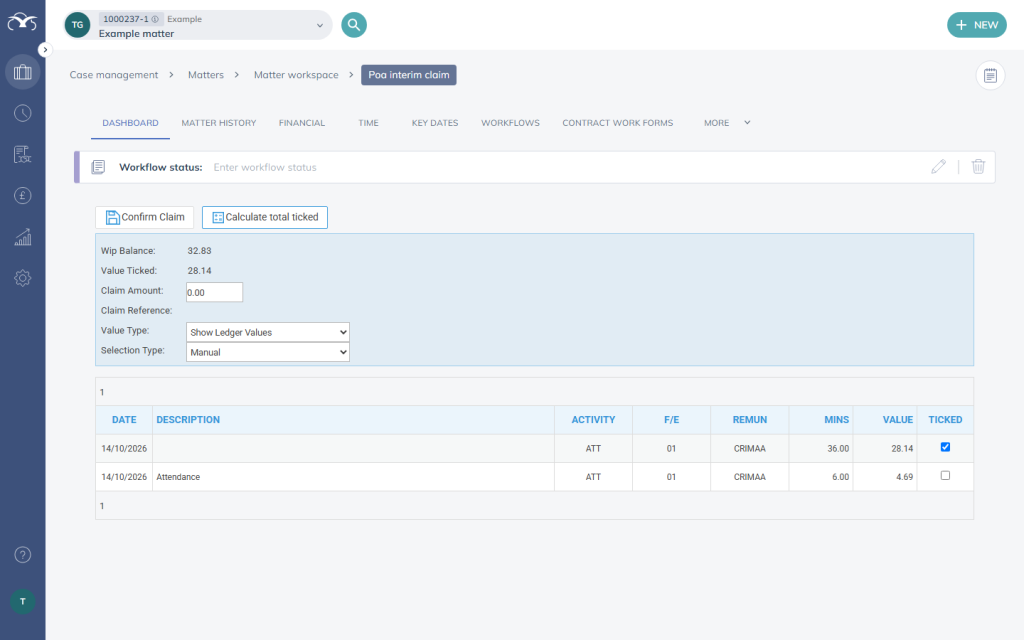
Ledger or marked-up values: use the Value Type dropdown to switch between Show Ledger Values and Show Marked Up Values.
Claimed time stays on the Billing Guide: once claimed, the time is labelled [POA/Interim Claimed] on the printed Billing Guide, so you can see it hasn’t been finally billed.
Escape Status
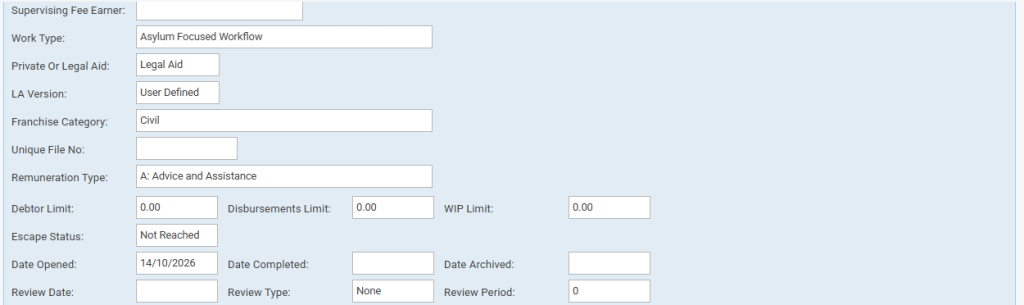
On a Civil Legal Aid matter, click … > Legal Aid details (classic view). Escape Status reads Reached or Not Reached. Osprey works it out afresh each time you open the page, so it’s always up to date.
Claim status on the Billing Guide
For Legal Aid matters, the detailed Billing Guide now lists claimed and billed time as well as outstanding time. Each entry starts with its status:
- [Unclaimed]: not yet claimed or billed.
- [POA/Interim Claimed]: included in a POA or interim claim.
- [Finally Billed]: included in a final bill.
- Go to Accounts > Billing > Billing Guide and load the matter.
- Choose the Detailed report, set the dates, and click Print.
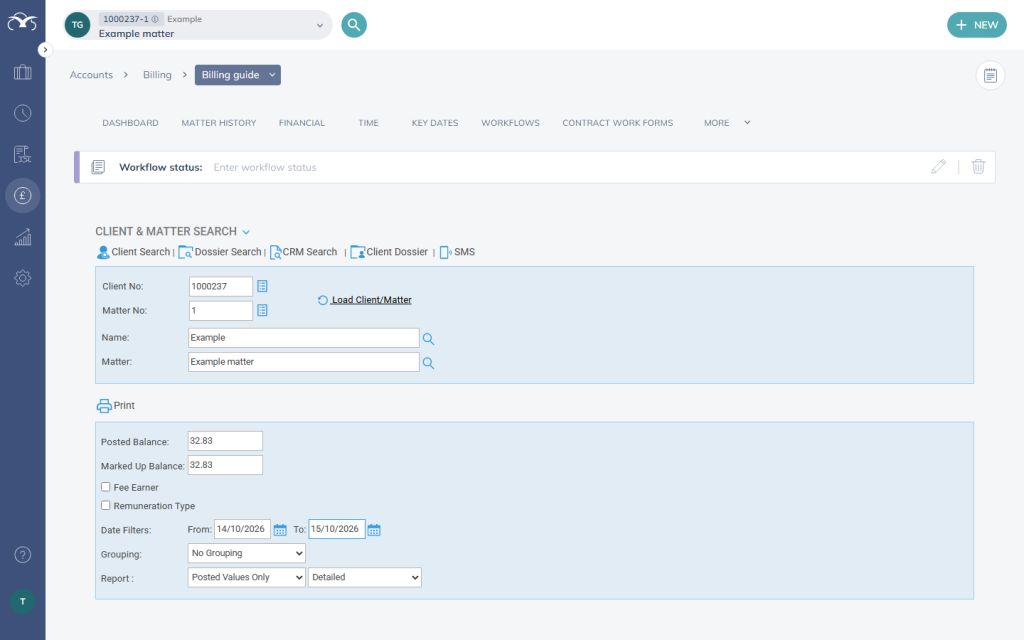
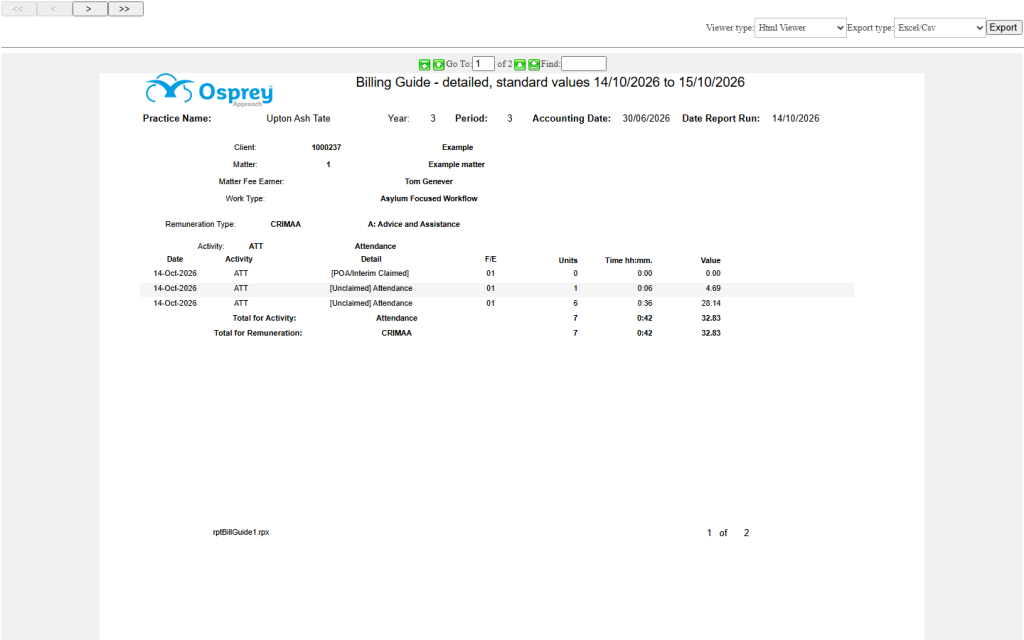
Totals are unchanged: claimed and billed entries show 0 in their units, time and value columns, so they’re listed for information but not counted twice. Private matters and the Summary report print exactly as before.
Exporting costs to CostsMaster
- On a matter with a linked certificate, click … > Legal Aid details (classic view).
- Click Export CostsMaster CSV.
- Osprey downloads a CSV file named after the client, matter, date and time.
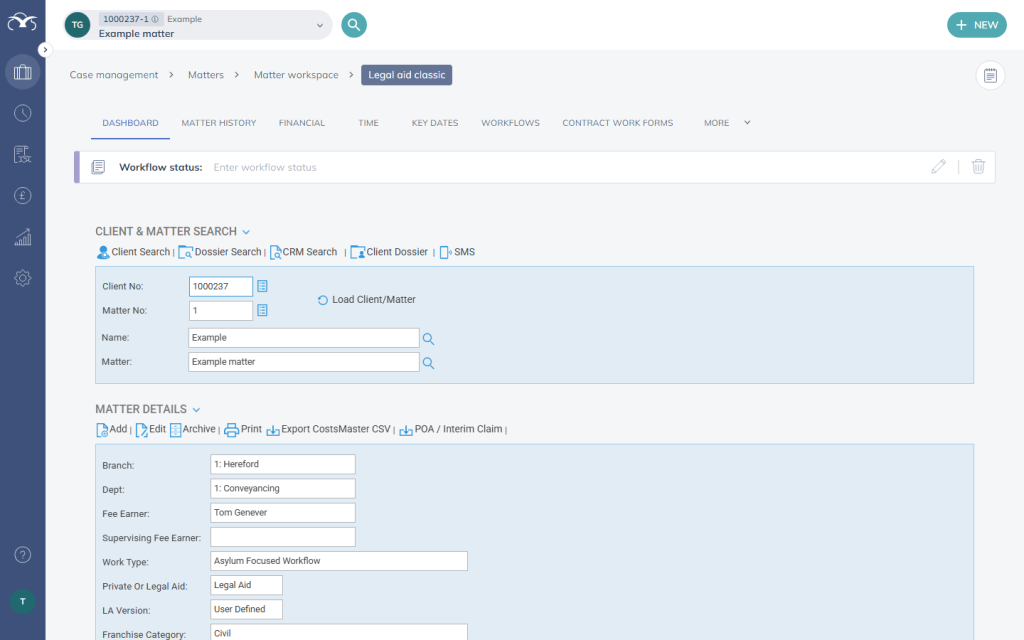
Enhancements are included: time recorded with a Legal Aid Enhancement % is exported at its enhanced rate.
No button? It shows only once the matter has a linked certificate. See Setting up a Civil Legal Aid matter, above.
Troubleshooting
The Certificate and Fixed Fee fields don’t appear: check the matter is set to Legal Aid and that its Franchise Category is a Civil one. Both fields stay hidden on Private matters and on other categories, such as Crime.
My certificate isn’t in the Certificate list: certificates are held against the client. Click Manage Certificates, check the certificate is on that client’s list, and add it if not.
Manage Certificates doesn’t open from the edit screen: it opens in a new tab. Allow pop-ups for Osprey and try again.
I can’t type in Legal Aid Enhancement %: the column is available only on rows for Legal Aid matters. Check the Client No and Matter No on the row.
The certificate position doesn’t show on the matter: it shows only once the matter is linked to a certificate. Edit the matter and choose one in Certificate.