Billing a Client
Updated May 28th, 2025
Who is this guide for?
Any Users
This guide will take you through the process of billing a client
When billing a client, it is recommended that all disbursements and time recordings you wish to include are already posted onto the Matter. If there are time postings not yet posted, users can defer time ticking, and allocate the time at a later point.
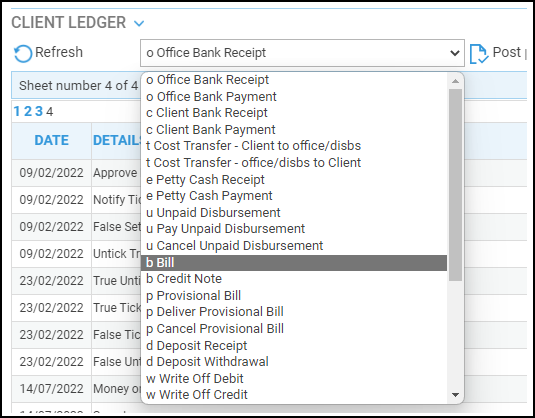
To Post a Bill
On the relevant client ledger, select ‘Bill’ from the Posting drop-down list and click ‘Post’.
The Posting window will open
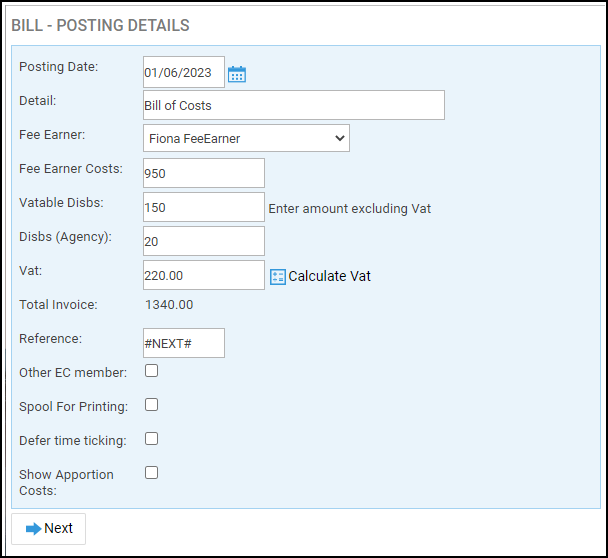
The ‘Fee Earner’ field defaults to the matter owner, and the date to Today’s date, but both fields can be amended.
Enter a short posting description within the Detail box.
Now enter the appropriate Fee Earner costs in the ‘Fee Earner Costs’ field should any be incurred.
Enter the net total (excluding VAT) of any vatable disbursements and the total of non-vatable disbursements incurred in the respective Vatable and Agency disbursement boxes.
Use the ‘Calculate VAT’ button to automatically calculate VAT, or users can manually enter a value.
If a custom value has been entered within the VAT box, a further confirmation window will appear.
‘Total Invoice’ automatically shows the total invoice value once the fields above have been completed. This cannot be changed manually.
If ‘Bill Numbering’ is switched on, the Reference field will contain the text ‘#NEXT#’.
Leave this in place if you wish Osprey to automatically number the bill for you. The next bill number to use is set in Supervisor > System Setup > System Settings (you will need to click Edit at the top of the screen to make any changes here).
Alternatively, you can overtype this field if you wish to enter the bill number manually.
The selection boxes will allow you to denote:
Other EC Member: Select if the client is based outside the UK
Spool For Printing: If you wish to print a physical copy of the bill, dependent on a bill template having been created. Please note that this can be set to be ticked as default by a system supervisor.
Defer Time Ticking: If the time recordings are not up to date, you can defer time ticking until all time recordings are complete. Leaving unticked allows the user to allocate time now.
Show Apportion Costs: will display a further screen within the bill posting where you can split your bill costs between a number of fee earners.
Please note that this option is dependent on setup. If required, a ‘Costs Apportionment’ switch needs to be enabled by a system supervisor.
Once the posting details are complete, click ‘Next’.
VAT Check
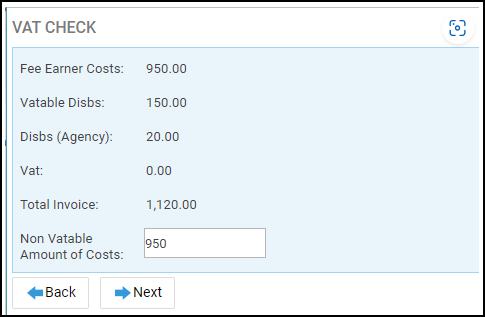
If you have manually entered a VAT amount, a VAT check will appear, asking to confirm the full Non-Vatable value of costs. This will pre-populate with the Fee Earner Cost value but can be amended if required.
Allocate Disbursements
The disbursement allocation screen will now appear.
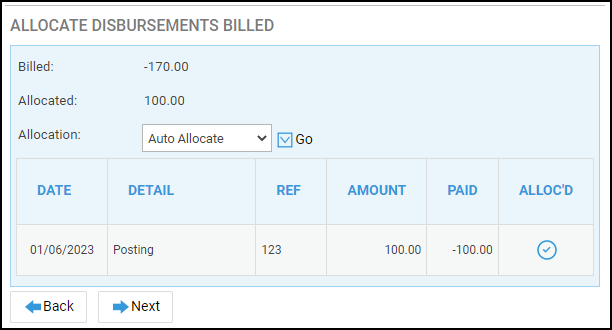
Manually allocate the disbursements by clicking on Icon within the Alloc’d column or select “Auto Allocate” from the allocation drop-list list.
Click “Go” and the disbursements will be allocated.
Time Allocation
The ‘Time Allocation’ screen will appear provided ‘Defer Time Ticking’ was not ticked on the first screen.
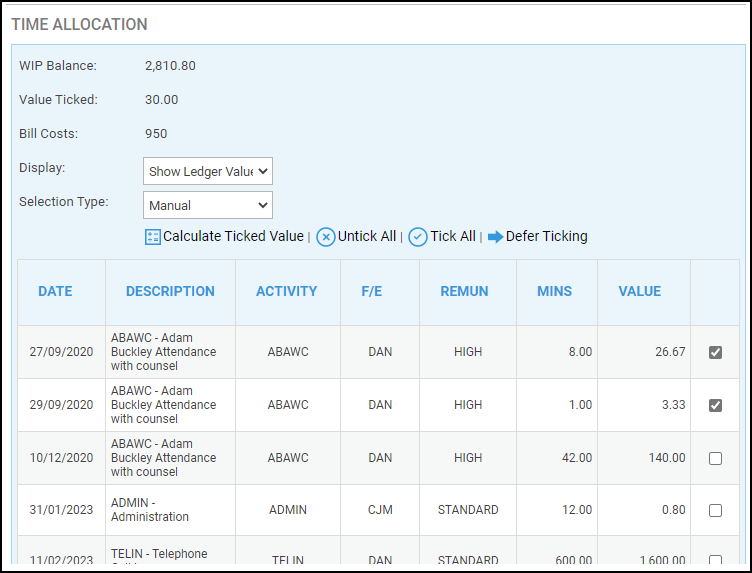
You can choose a selection type to assist you with selecting the time to tick against the bill.
Alternatively, you can simply tick the boxes alongside the relevant time entries to bill.
Use the ‘Calculate Ticked Value’ button to ensure that ‘Value Ticked’ matches the ‘Bill Costs’. You can choose to defer this action by selecting “Defer Ticking”.
We are going to allocate all of the time by clicking ‘Tick All’.
If you’ve not ticked ‘Show Apportion Costs’ on the first screen, you will have the option to click ‘Post’.
Click ‘Next’.
Cost Apportion
If selected, the Costs Apportion screen is then displayed. Select the first fee earner from the list that you want to apportion costs to.
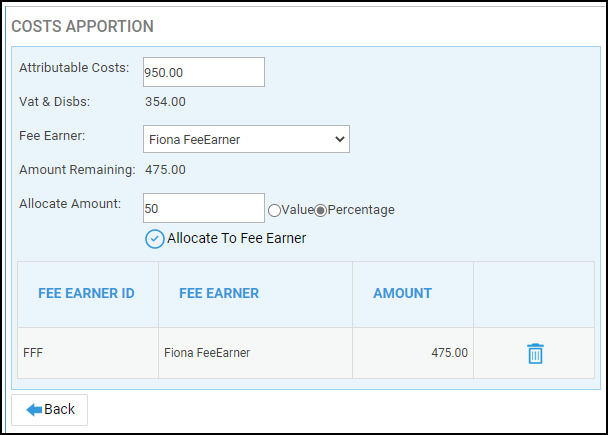
You will have the option to allocate the amount by ‘Value’ or ‘Percentage’.
For example, if your bill is for £950, which is attributable to 2 fee earners equally, you could select ‘Percentage’ and enter 50 in the ‘Allocate Amount’ box.
To achieve the same result you could select ‘Value’ and enter 475 in the ‘Allocate Amount’ box.
Click ‘Allocate to Fee Earner’ when you have entered the amount, and then repeat for any additional fee earners until the ‘Amount Remaining’ states 0.
Now let’s click ‘Post’.
Printing the Bill
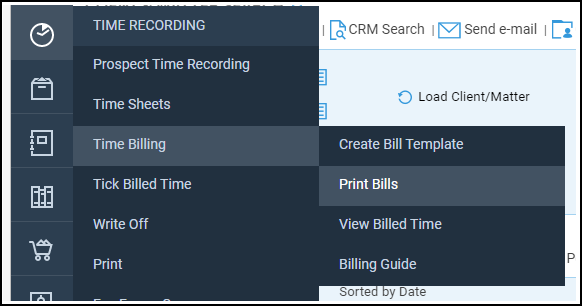
To print the bill, click on the ‘Time Recording’ tab, then select ‘Time Billing’.
Next, select on ‘Print Bills’.
Any pending bills will displayed. There are some filtering options at the top of the page. If a bill has already been printed, you will be able to reprint it by selecting ‘Printed’ from the drop down list.
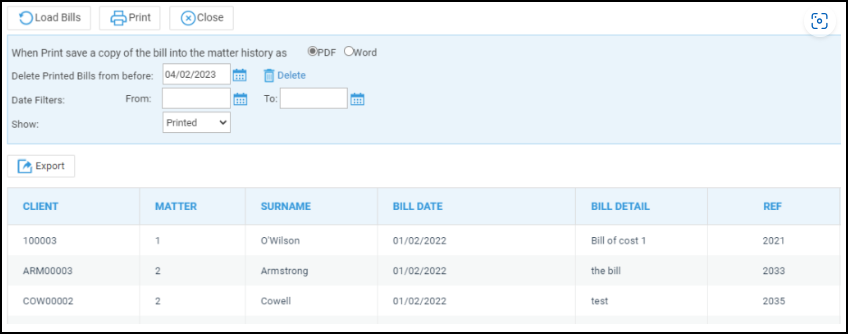
Tick the bills that you wish to print.
Select whether you want a copy of the bill to be saved as a PDF or Word document in the matter history.
Click ‘Print’.
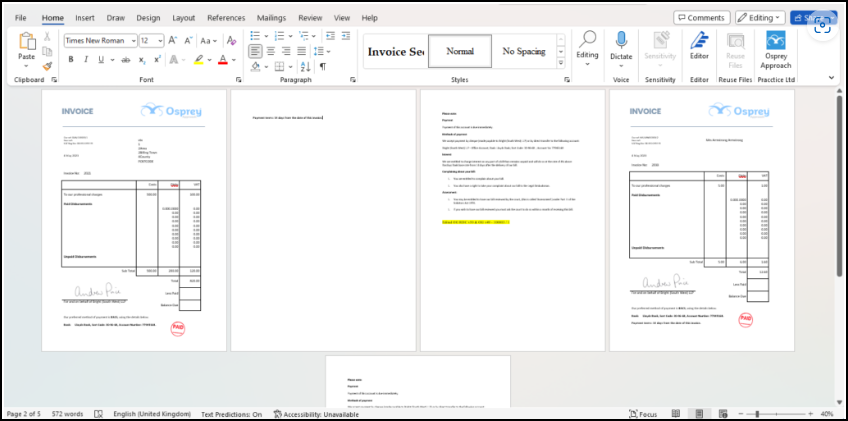
The selected bills will open in Word and the document can be printed.
If the user wants to edit the bill and save the changes into Osprey, they will need to close the document and check out the document from the matter history.
Re-Printing Bills
To re-print a bill, click on the ‘Time Recording’ tab, then select ‘Time Billing’.
Next, select on ‘Print Bills’.
Any pending bills will displayed. To filter to bills that have previously been printed, select ‘Printed’ from the drop down menu next to ‘Show’.
Tick the bills that you wish to re-print.
Select whether you want a copy of the bill to be saved as a PDF or Word document in the matter history.
Click ‘Print’.
The selected bills will open in Word and the document can be printed. When bills are re-printed, a copy is automatically saved into the matter history.