CRM6 Billing – Set Up
Updated May 13th, 2024
Who is this guide for?
Accounts Supervisors and Case Management Supervisors
This guide will go through setting up Osprey to allow CRM6 billing
Osprey Approach allows you to set up auto-billing to post both bills and LAA receipts onto the Client Ledger when the CRM6 and CRM11 reports are run. Please ensure that all sections are filled in as described below.
Check the System Posting Date
The auto postings to be made by Osprey will use the current posting date. Please ensure that this is correct by checking within Supervisor > Financial Periods – the current posting date will be displayed at the top of this screen.

If you wish to select a different posting date, click Set Posting Period Date towards the top right hand corner of the screen, and select the date you require, remembering to Save your changes.
Add an LAA Control Bank
Firstly, a dummy office bank must be set up within the system. This is for your ease of reconciliation, as every matter included in your CRM6 run will have its LAA receipt posted to this office bank when auto posting is switched on. The LAA control bank cannot be the default office bank. Navigate to your Supervisor area and select Financial Setup. Now click Banks and select Add Bank.

To avoid confusion with your regular office banks, use an account code which does not follow your usual convention.
Ensure that you enter a meaningful description that makes it clear what the bank is for and finally, ensure that you select the bank type as ‘Office’, and do not set this as the default bank for any branches.
Add a Mileage Nominal
A Mileage nominal must be set up within the system – journals for the mileage claimed from time postings will be posted to this nominal. If you don’t already have one, you can add this by following the steps here: Managing Nominal Ledgers >
Turn on CRM6 Auto Billing
Under the Supervisor area, select System Setup and then select Configuration Settings.
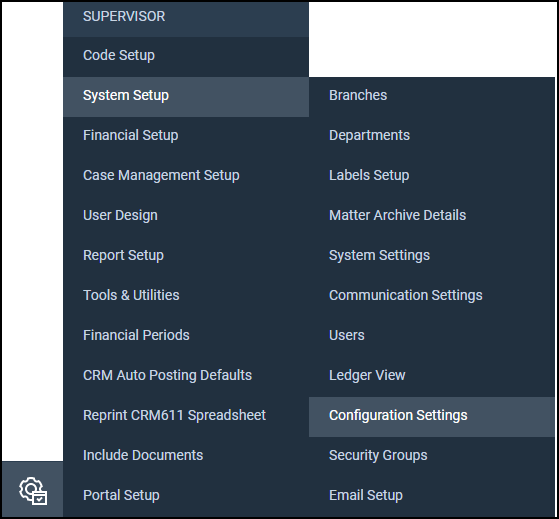
Ensure that the switch called CRM Auto Billing is set to True if you want the bill and receipt postings to be made automatically.
Please Note: Once the automatic postings have been made by Osprey, there is no quick way to remove these, they must be undone manually, and any time ticked against bills reinstated.
Fill in CRM Auto Posting Defaults
In the Supervisor area, select CRM Auto Posting Defaults and fill in all of the information.
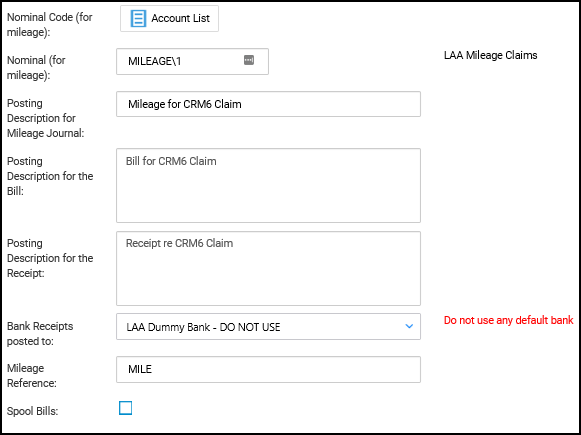
Nominal Code for Mileage – select the code to be used for journal postings for mileage. You can then enter the Posting Description you want to use for the auto Mileage postings.
Enter the posting description you want to use for the auto Bill postings. If you use automatic bill numbering in Osprey, the auto posting will use this sequencing for the CRM auto posted bills.
Enter the posting description you want to use for the automatic receipt postings. Each time a batch of CRM reports is run, a batch number is generated – this reference will be used for the posting reference of the receipt posting.
In the Bank Receipts Posted To box, select your newly created LAA Control dummy bank.
Enter the posting reference you would like to use for the auto Mileage postings.
Finally, there is a tick box to Spool Bills. If you tick this, you will be able to use the existing Bill Printing function in the Time Recording area to generate CRM11s – these when printed will be saved to the matter history area of Osprey. The normal bill template will be used for non-CRM6 bill postings.
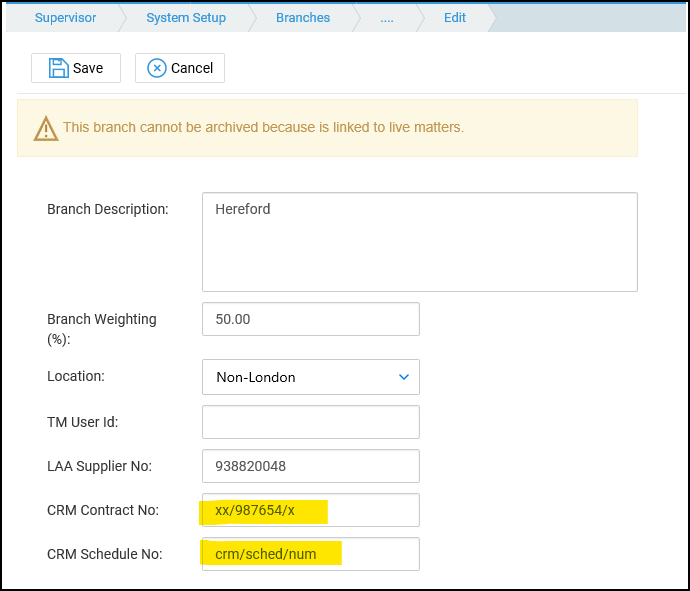
Add your Schedule and Contract Numbers
From Supervisor > System Setup > Branches, edit each of your branches in turn and ensure that the CRM Schedule no and CRM Contract no are present and correct:
Install the Osprey Gateway
In order to run the CRM6/11 report, your machine will need to be running the latest version of the Osprey Gateway >