Installing the Osprey Gateway (Remote Desktop)
Updated Mar 11th, 2026
Who is this guide for?
Any Users
This guide will take you through how to install and log in to the Osprey Gateway in a remote desktop environment.
If users using the Osprey Gateway (RDS) on multiple PCs, ensure you have logged out of the Gateway before logging into the new machine.
Osprey Approach offers the ability to produce documents via any web browser, such as Chrome and Edge, when running from a Windows PC.
To be able to do this, users will need to install the Osprey Office Gateway App, to allow document production within Microsoft Word.
Installing the Osprey Gateway (RDS)
Click the download link below to start the download.
Download Osprey Gateway for Remote Desktops
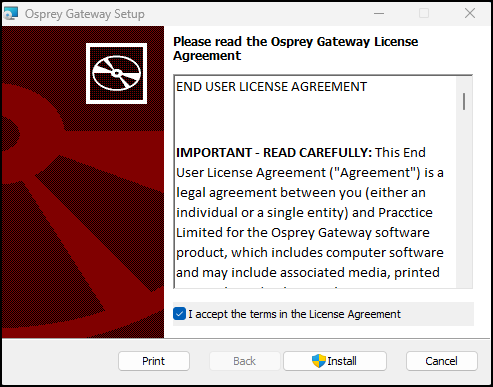
Once downloaded, run the Setup.msi. This will open a prompt. Click Install.
Code Signing Certificate Update
Microsoft (Windows Defender) deemed our old installer as potentially malicious due to its dated code signing certificate, this has now been updated in this version to satisfy Microsoft’s application installer practices.
Users would usually receive a prompt before install (Are you sure you want to run this application?) IT Admin would sometimes have to create policy exceptions to allow our installer to run
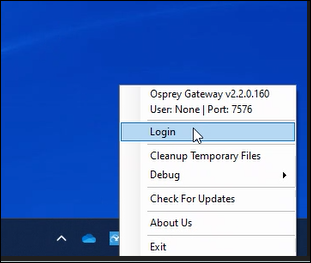
Once complete you will see the Osprey in the Notifications Tray and if you right click you will see some more options along with the version number
Automatic 32bit / 64bit office install location detection
On install the Osprey Gateway app will now automatically detect whether the user is using 32bit or 64 bit Office & therefore reference the correct locations for office. It doesn’t matter now if the user is running 32bit or 64 bit.
MSI Installer
We’ve migrated away from the unreliable .exe Installer using old development methods of application installation, to a more modern install method for centralised deployments. You can still use this installer for a single install on a customers machine if you need to, the fact its now an MSI just helps our customers IT staff recognise an installer that is easier to deploy centrally if they needed to.
Logging in
To use the Osprey gateway in a remote desktop environment, you will need to log in to the gateway. You can do this in the tray by the time/date. Right click on the gateway icon and select log in
When login is selected the below screen will appear. Enter your osprey URL, Username and Password to log into the gateway the exact same way you would log into osprey.
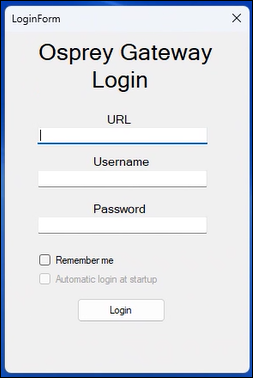
Please note: The URL must contain ‘/main’ e.g. https://yoursite.ospreyapproach.com/main
To save your gateway credentials, please tick “Remember me” and “Automatic login at startup”.
Once you have logged in to the gateway, you can log in to Osprey in your browser of choice and produce and amend your documents as expected.
Security warnings
If users receive a Security warning when running a document, users may also need to add C:\Users\Username\Documents\OspreyOfficeGateway and all subfolders to Word’s Trusted Locations.
Please click the below guide for further information on how to prevent further warnings.
Enabling pop-ups
To ensure the save prompt appears when closing a word document, please refer to the below guides and ensure Osprey is allowed permissions for Pop-Ups.
Need the regular Osprey Gateway?
If you are not using a remote desktop, or terminal server, please install the Osprey Gateway from the guide below.